Integrating ODIN Voice Chat with the atmoky trueSpatial solution in Unity
Introduction
Welcome to this guide on integrating the ODIN Voice Chat Plugin with the atmoky trueSpatial solution in Unity. The code used in this guide is available on the atmoky branch of the Unity-Tech-Demo repository on Github.
What You'll Learn:
- How to add the atmoky trueSpatial Plugin to your Unity project
- Properly set up ODIN in Unity when using atmoky as an audio solution
- Deal with limitations and potential pitfalls
Getting Started
To follow this guide, you'll need to have some prerequisites:
- Basic knowledge of Unity
- The atmoky trueSpatial Plugin for Unity, which you can get here
- The ODIN Voice Chat Plugin, available here
To set up the ODIN Voice Chat Plugin, please take a look at our Getting-Started guide, which you can find here:
Begin ODIN Getting Started GuideTo set up atmoky trueSpatial in your project, please follow atmoky's in-depth integration tutorial. You can find the tutorial here. An overview of their documentation can be found here. The basic steps to install atmoky are:
- Go to atmoky's download page for their Unity integration
- Fill out their form
- You will receive an email containing a download link of their Unity Package
- Unzip the Package and add it to the
{Project}/Packagefolder
Integrating Atmoky Spatial Audio
After you have properly setup atmoky trueSpatial in your project you need to follow a few more steps to enable Odin Sources to render their audio with it. For the following steps we assume that you have followed the atmoky and Odin Getting Started Guides.
Assigning Odin Sources to Atmoky
After adding the PlaybackComponent and AudioSource to your Game Object (most likely representing a Player Character) you can add an AtmokySource component to it. This component allows you to control the behavior of the source in regards to the Atmoky Audio Renderer. Settings that are supported by the Built-In Unity Renderer can be adjusted as usual on the AudioSource component (e.g. the attenuation curve). See the documentation of atmoky to learn more.
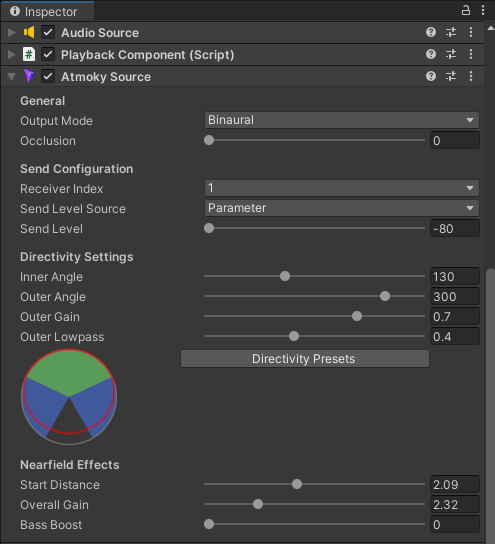
Binaural Rendering
On the AtmokySource component you can also enable binaural audio rendering with the Output Mode property which produces a very natural sounding spatialization when listening on headphones.
Directed Sounds
In the Directivity Settings category you can adjust the adjust the sounds loudness based on the angle between the source and the audio listener. This helps create a more immersive rendering of player voices, especially when playing with multiple smaller groups. Again, you can refer to the atmoky documentation for more details.
Occlusion
To enable occlusion you need to follow some more steps. First you need to add the AtmokyOcclusionProbeGroup component to your audio sources. In this component you can adjust the behavior of the occlusion algorithm, like how many occlusion probes to use, where they are located etc. Another step to do is assigning an AtmokyAudioListener, this is especially useful if you have a third person camera in your game.
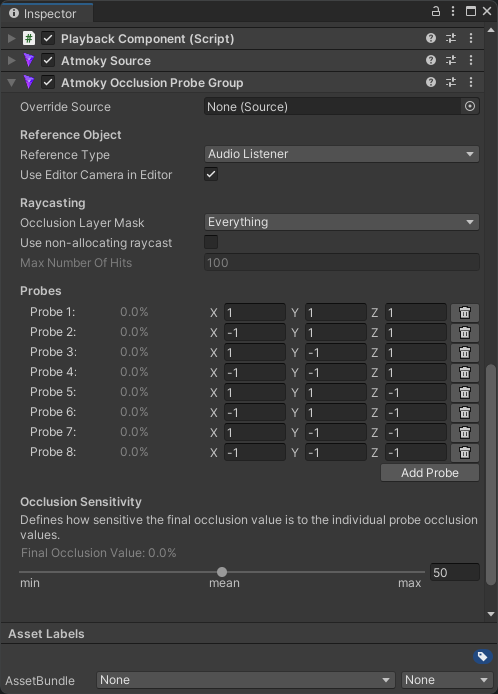
Lastly you need to add an AtmokyOccluder component to every game object that should occlude the audio source. Here you can set the strength of occlusion through this object. By using occlusion layers on your occlusion probe group and occluders you can also filter the game objects to use for occlusion.
You can find more detailed information in the atmoky documentation.
Conclusion
Atmoky can bring a whole new level of realism to your voice chat solution. There are many more features that can enhance the experience even more, like near-field effects, an externalization booster, boosting the out-of-head sensation, and more. This works very well in conjunction with the flexible voice chat solution of Odin.
To ease the development of complex voice chat setups, Odin also offers solutions like a Mirror Transport System, orUser Data.