This is the manual for version 2.x of our ODIN Voice Chat SDK. If you're looking for the v1.x manual, please look here. If you want to update to v2, please check our migration guide to learn how to easily upgrade your project.
Manual
The Unreal Engine plugin comes with full blueprint support to make it as easy as possible to use ODIN in your game. Please make sure to have a basic understanding of how ODIN works as this helps a lot in understanding the next steps.
This manual highlights the key steps to take to get started with ODIN. For a more detailed implementation please refer to our Unreal Minimal Samples project. Select the blueprints in the project, copy them and paste them in your own project to get started quickly! We also have a small introduction into the project available in our documentation.
Basic Process
If you have read the introduction you have learned that every user connected to the same ODIN room (given by a string of your choice) will be able to exchange data and voice. An ODIN room is automatically created by the ODIN server when the first user joins and is automatically removed once the last user leaves.
To join a room, an access token needs to be created. An access token gives access to an ODIN room and can be created within the client. For testing and development purposes that's fine. In production, you should create an access token on the server side. We'll provide various packages for JavaScript (npm) or PHP (Composer) to create access tokens, and we also have a complete server ready to go that you can deploy as a cloud function to AWS or Google Cloud.
After the room has been joined, data can be exchanged, i.e. text chat messages or other real-time data. If your user
should be able to talk to others, a microphone input has to be added to the room. Use an Odin Encoder to capture audio from the microphone
and send it to the room. To hear other users, you use Odin Decoders, which receive audio from the room and decode it, so it can be played back Unreal's audio engine.
Now, every user can talk to every other user in that room. More advanced techniques include 3D audio that allows you to update your position every couple of seconds to the server, which then makes sure that only users nearby hear your voice to reduce traffic bandwidth and CPU usage. But more on that later.
So, to summarize, the basic process is:
- Get an access key
- Create an access token with the access key for a specific room id (just a string identifying the room)
- Join the room with the access token
- Setup an
Odin EncoderandOdin Audio Captureto connect the microphone to the room - Setup
Odin DecodersandOdin Synth Componentsto hear other users
Authentication setup
Let's get started adding ODIN to an existing (or new) Unreal Engine Project. You'll find all Blueprint nodes under the category Odin.
This is the full blueprint that we are about to create:
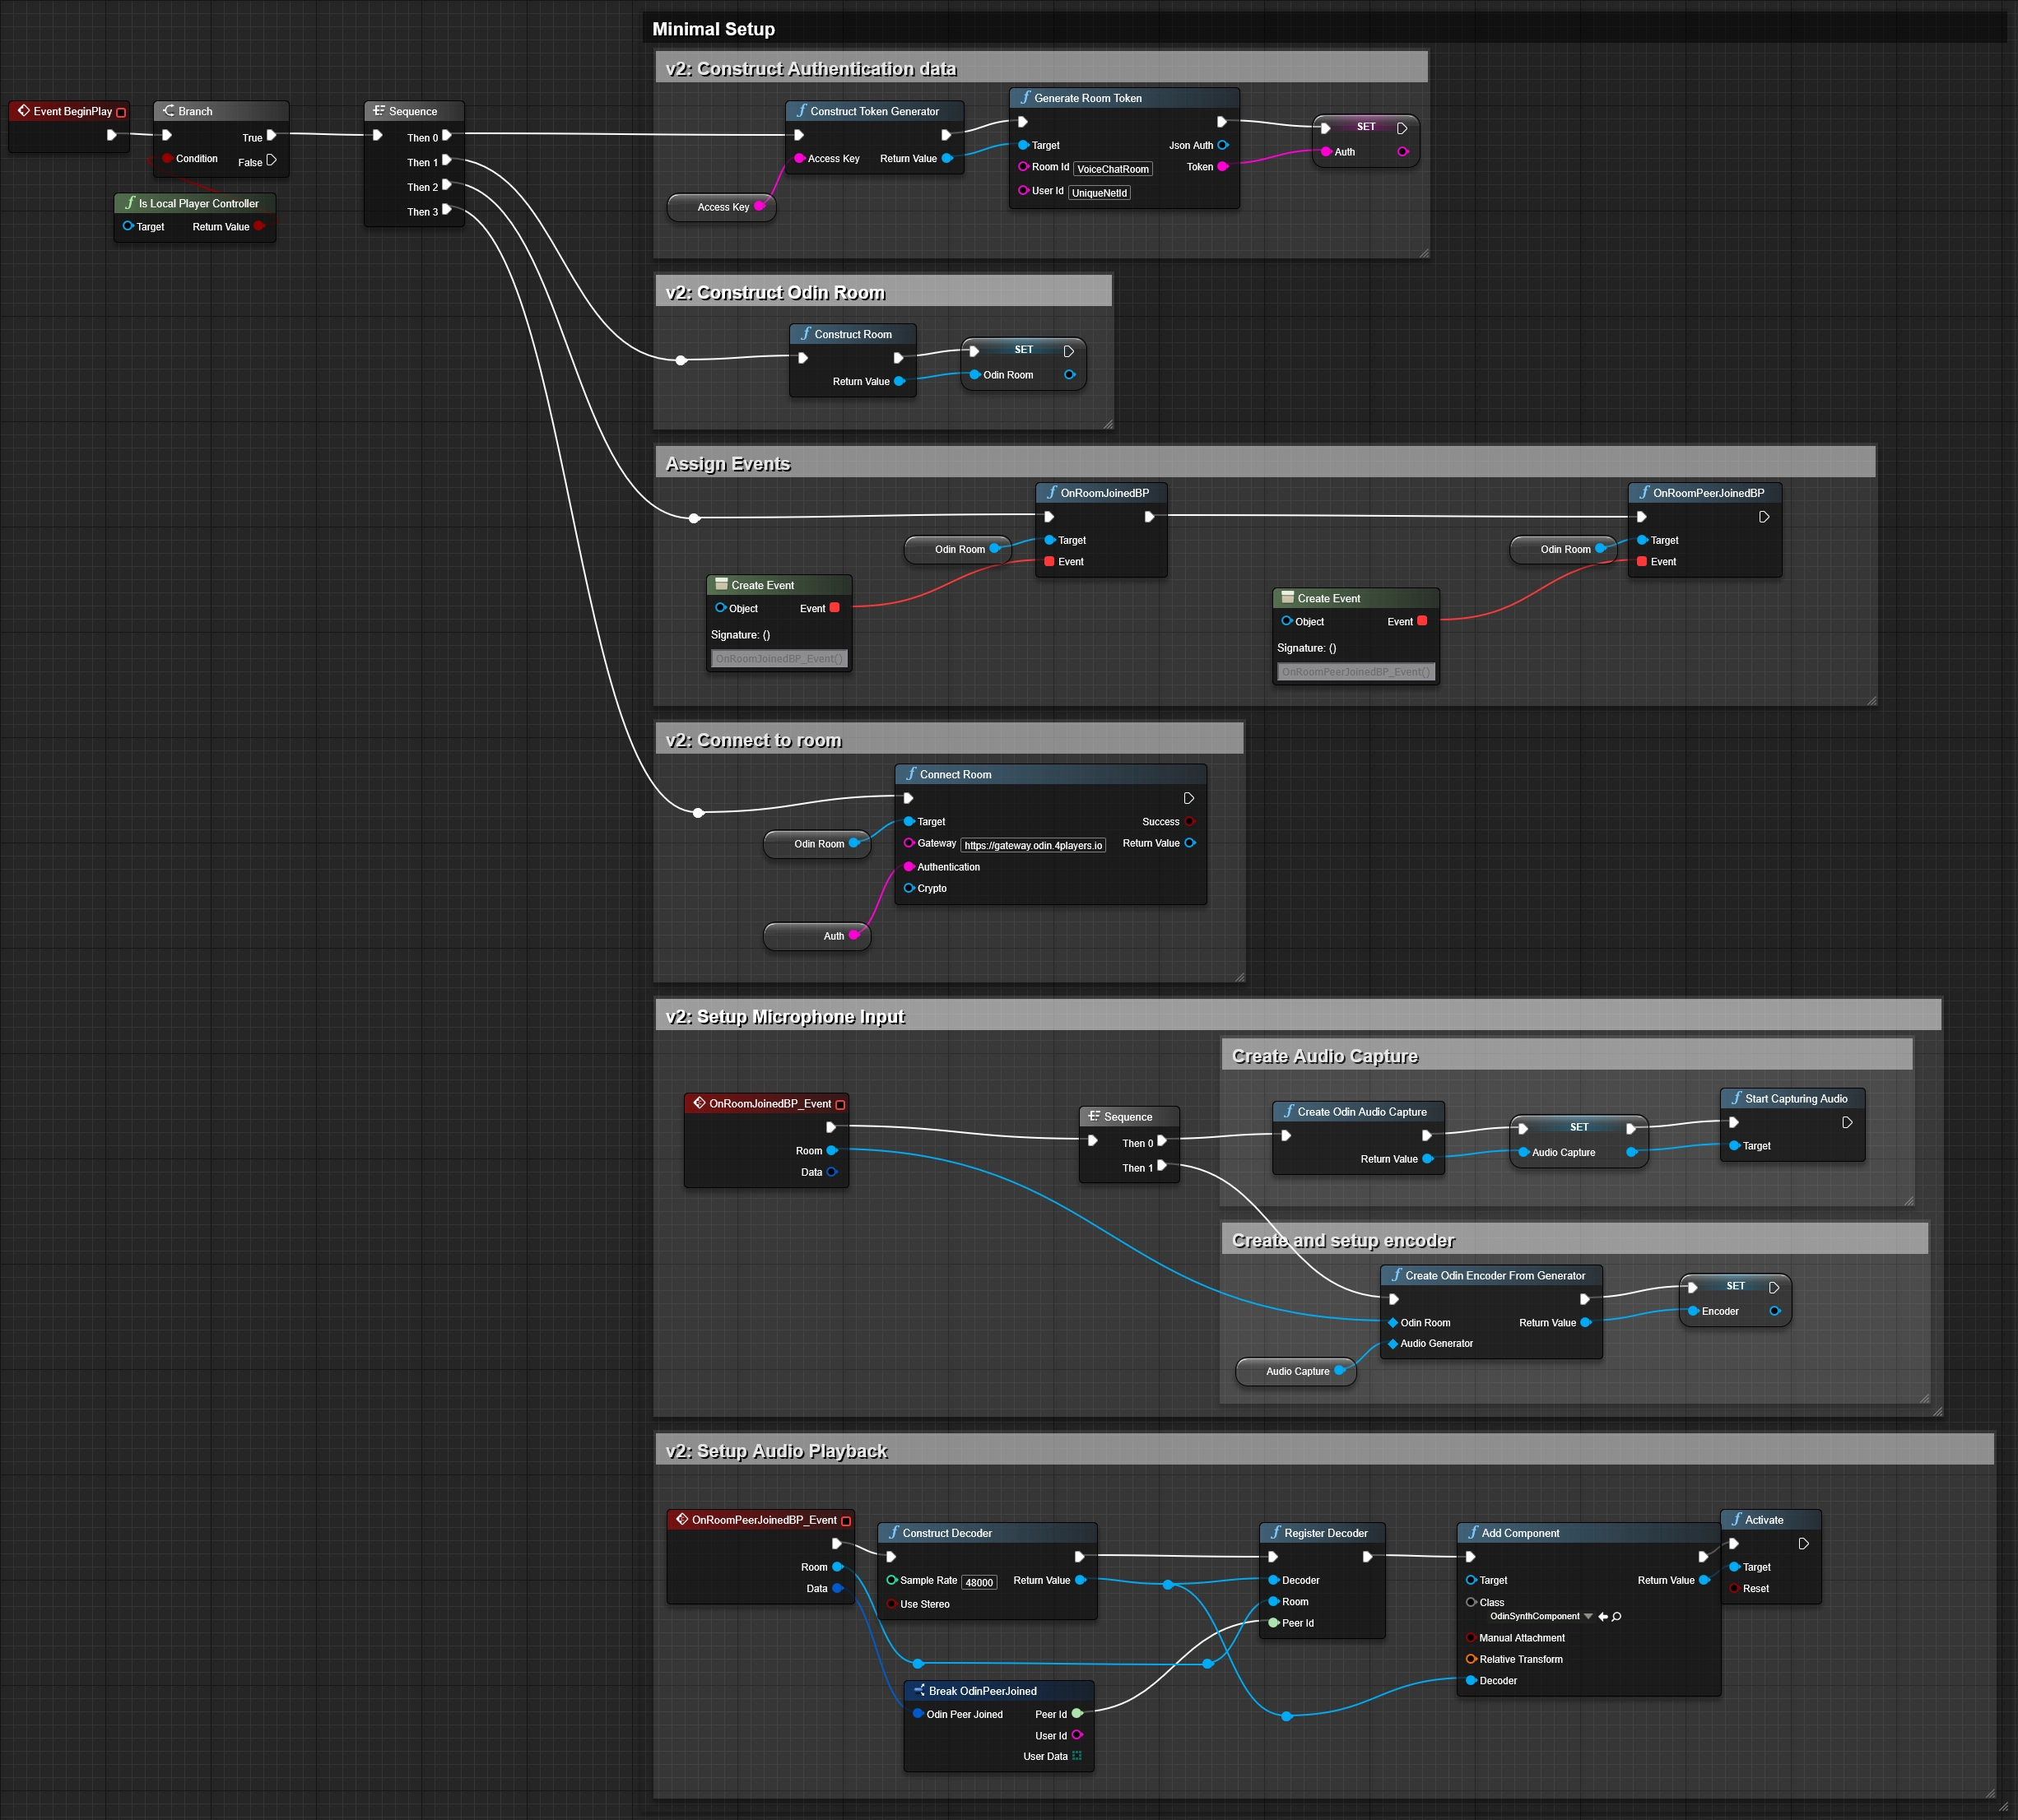
You can create the blueprint anywhere in your project - but it makes the most sense on your Default Player Controller Class - since this is where your Odin Synth Components will live. Just make sure that the blueprint runs on each client and not on the server (since the server doesn't need to be connected to the voice chat).
Creating an access key
First, you need to create an access key. The access key is used to authenticate your requests to the server and also includes information about your usage tier, e.g. how many users are able to join the same room and a few other settings. You can create a free access key for up to 25 concurrent users anytime. If you need more or want to go into production, you need to sign up with one of our tiers. See pricing for more information.
More information about access keys can be found in our Understanding Access Keys guide.
For now, you can use this widget to create a demo access key suitable for up to 25 concurrent users:
Click on the button to create an access key that you can use for free for up to 25 concurrent users.
Press the Create Access Key button and write the access key down somewhere. We'll need this access key a bit later
down the road.
Creating an access token
Add a Generate Room Token node to your Blueprint Canvas. Now, drag out from the left Target and choose Construct a Token Generator from the list. This will add the node to your canvas and connect both.
Now, enter a value into Room Id field. This will be the name of the Room. Next, enter the access key you previously generated into the Access Key of your Construct a Token Generator node. The User Id field is optional. It can be used to identify the user in the room.
Finally, drag a connection from the Token output and choose Promote to variable. We'll store the generated access token in a variable for later use. Let's name it Auth.
To kick off the connection process, we'll create an Event Begin Play node and connect it to the Construct a Token Generator node. In most use cases, you might not want players to be able to talk to everyone else right from the start. Choose another event in this case. But for testing purposes, this should be fine.
The access token generation part of your blueprint should look like this:
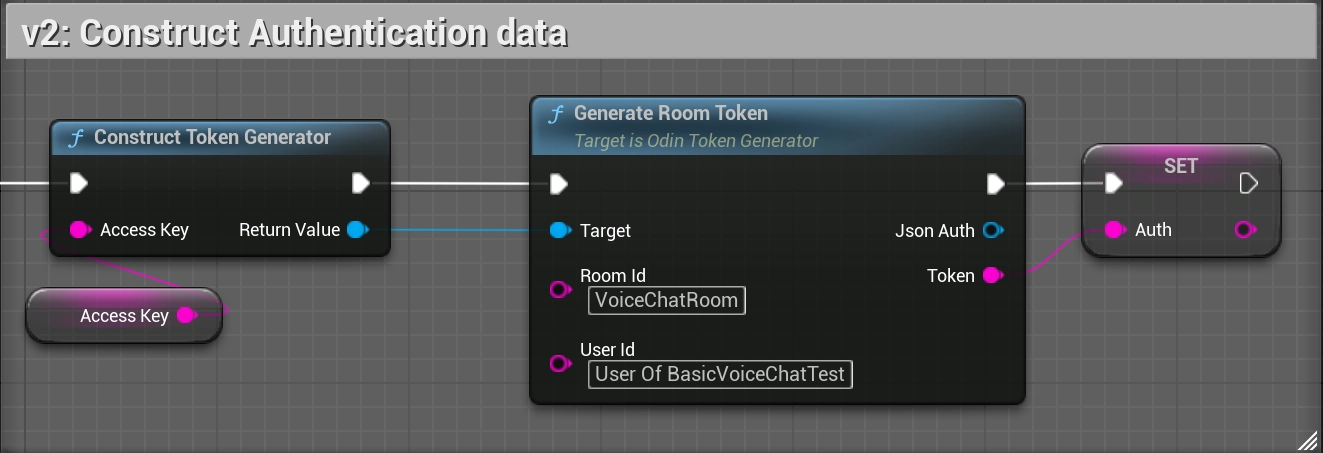
Be aware that access keys serve as your unique authentication keys, required for generating room tokens to access ODIN servers. To ensure your security, it's strongly recommended that you NEVER use an access key in your client-side code and instead generate room tokens on a server.
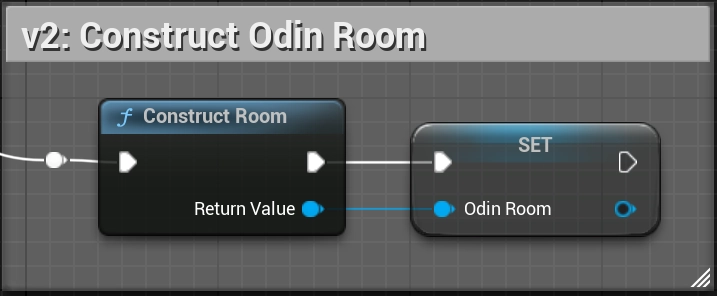
Construct the Odin room object
To join a room, we first need to construct a room object. Create a new Construct Room node. Let's store the return value - our OdinRoom object - in a variable. We'll need this object later on to connect to the room.
The room object construction should look like this:
Event Flow
Once your client is connected to the ODIN server, several events will be triggered that enable you to set up your scene and connect audio output to player objects. Understanding and handling these events correctly is essential for a functioning voice integration.
The following table outlines the flow of a sample basic lobby application.
| Step | Name | Description |
|---|---|---|
| 1 | Connect Room | The user navigates to the multiplayer lobby. All players currently in the lobby are connected to the same ODIN room, allowing them to coordinate before playing. The application calls Connect Room. Note: The ODIN server automatically creates the room if it does not already exist. No bookkeeping is required on your end. |
| 2 | Peer Joined - already connected peers | Before the On Room Joined event is triggered, you will receive On Peer Joined events for each peer that is already present in the room. Keep this in mind when setting up your gameplay logic. You can either start processing the audio streams of already connected peers right away, or wait for the On Room Joined event. |
| 3 | Room Joined | The On Room Joined event is triggered, giving you the opportunity to run logic on the client as it joins (e.g. starting microphone capture). |
| 4 | Peer Joined - new peers | For each user joining the room, an On Peer Joined event is fired. This event provides the peer's ID and UserData. This is where you handle audio playback. You must create an Odin Decoder, register it to the peer, and assign it to an Odin Synth Component so you can hear them. |
| 5 | Peer Left | When a user leaves the room, the On Peer Left event is fired. Important: You will need to destroy previously created Odin Synth Components, as they will not clean themselves up automatically. Decoders will be cleaned up automatically, as long as there are no references left to any decoder objects, e.g., if you're storing them in a map or array, you'll need to remove them from the data container. |
This event sequence forms the backbone of how ODIN synchronizes users and audio streams in real time. By correctly handling these callbacks, you ensure that your voice chat remains stable, synchronized, and responsive as players join, speak, or leave.
You should always set up event handling before joining a room.
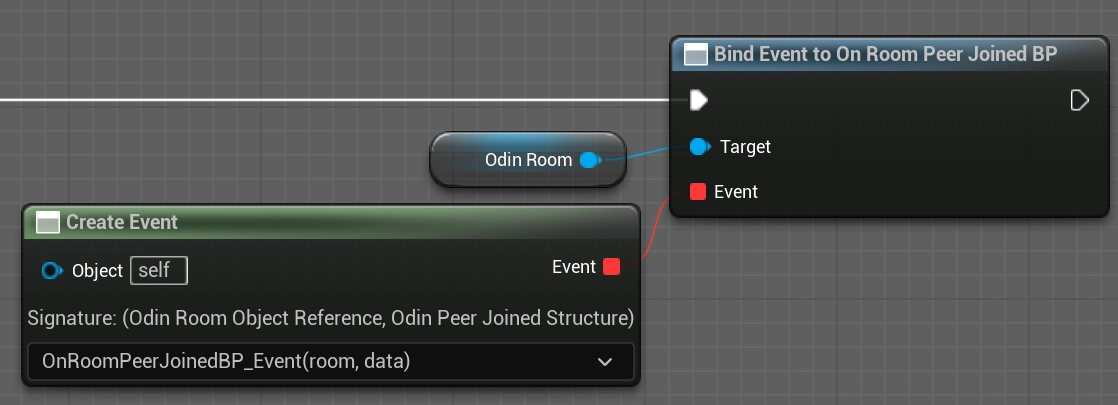
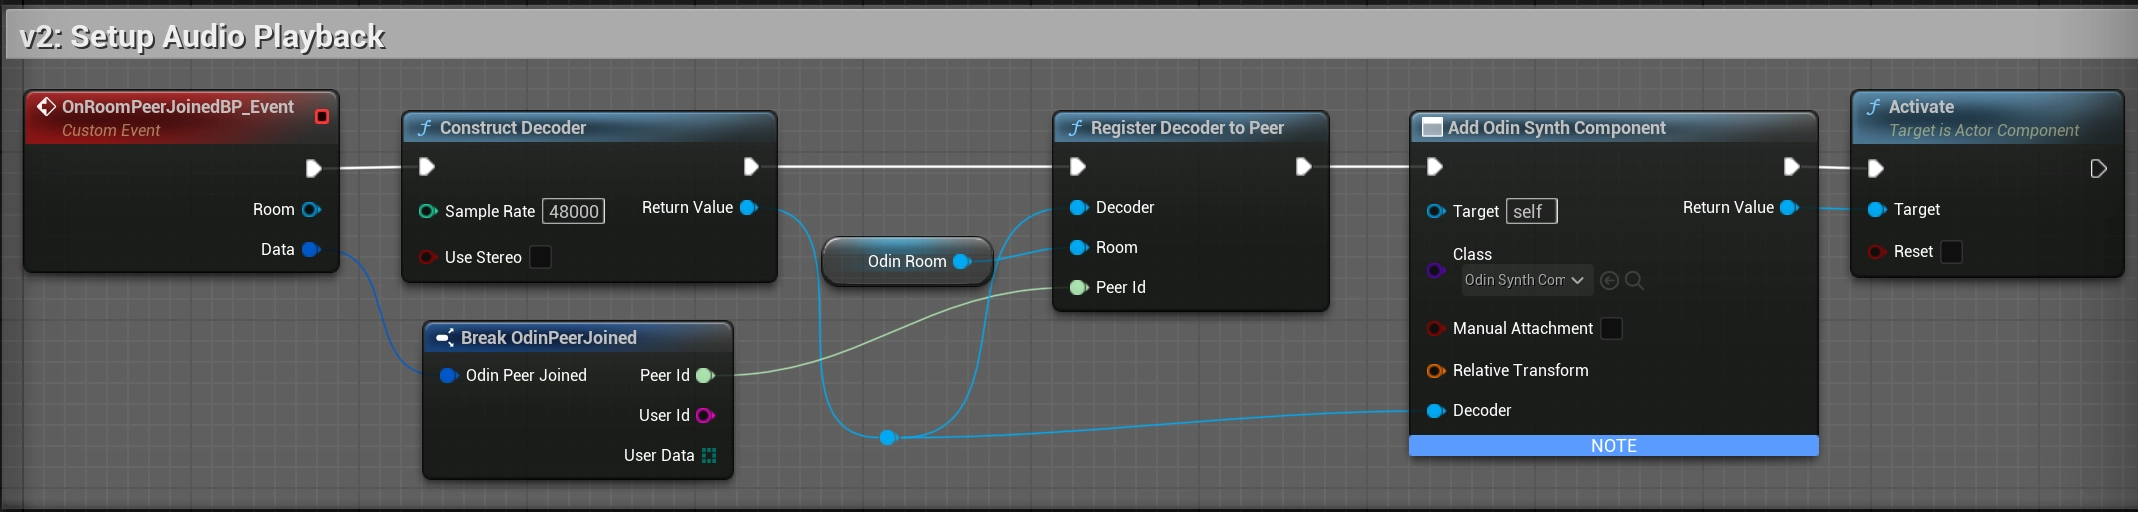
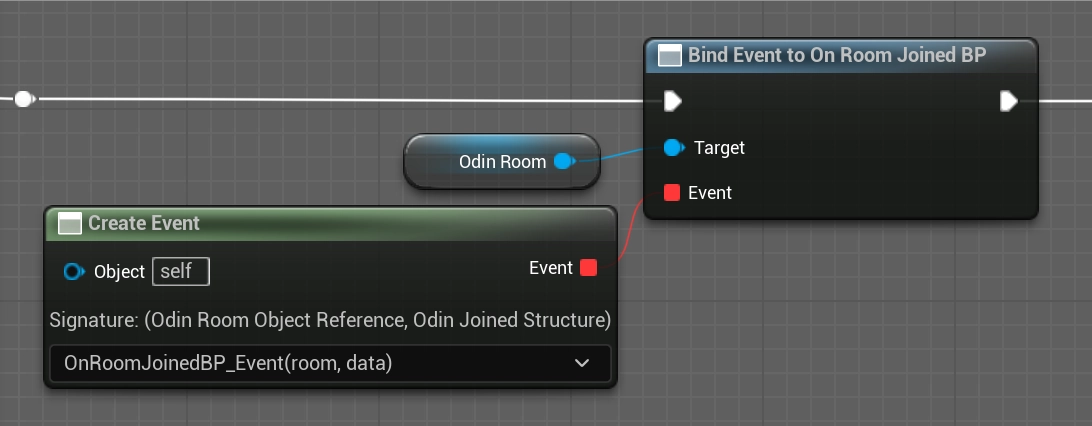
Adding a Peer Joined Event
To start off event handling, create a new Bind Event to On Room Peer Joined BP node. You'll need to connect the Odin Room object reference that you created earlier with the Construct Room node. This way, you can easily handle events differently for different rooms you connect. You can even connect multiple rooms at the same time, but handle them differently in your code.
Now, that you have created that node, drag out from the Events slot until you see a red line. To make our blueprint clearer, we'll use the Create Event function and choose [Create a matching event] to create a custom event.
Don't forget to connect the Exec slot with the process flow of your application, see the blueprint overview.
In this event, we will setup the audio playback for the peer. We need to:
- Create a
Odin Decoder. - Register the decoder to the peer and room.
- Assign the decoder to an
Odin Synth Component.
To do this, create a Construct Decoder node. You can leave the defaults (48kHz, Stereo). Next, add a Register Decoder to Peer node. Connect the Decoder to it, and also connect the Room and the Peer Id from the event. We get the Peer Id from the events Data by calling Break OdinPeerJoined on the structure.
We need an Odin Synth Component to play the audio. You can add this component to your Player Controller blueprint in the Components panel, or add it dynamically. For this basic example, we will assume you add it dynamically to the actor using Unreal's Add Component by Class node.
Once you have the Odin Synth Component, call Set Decoder on it and pass the decoder we just created. Finally, call Activate on the Synth Component to start playing the audio.
It should look like this:
In a real 3D shooter with 3D audio you would not choose the local player controller, but map the Odin Peer Id with Unreal's Unique NetId and then assign the Decoder to the corresponding player character. This way, Unreal will automatically process the audio in its audio engine and apply attenuation, e.g. dampen the volume the farther away the player is from the listener.
For 3D audio, see the next chapter further below: Enabling 3D Audio
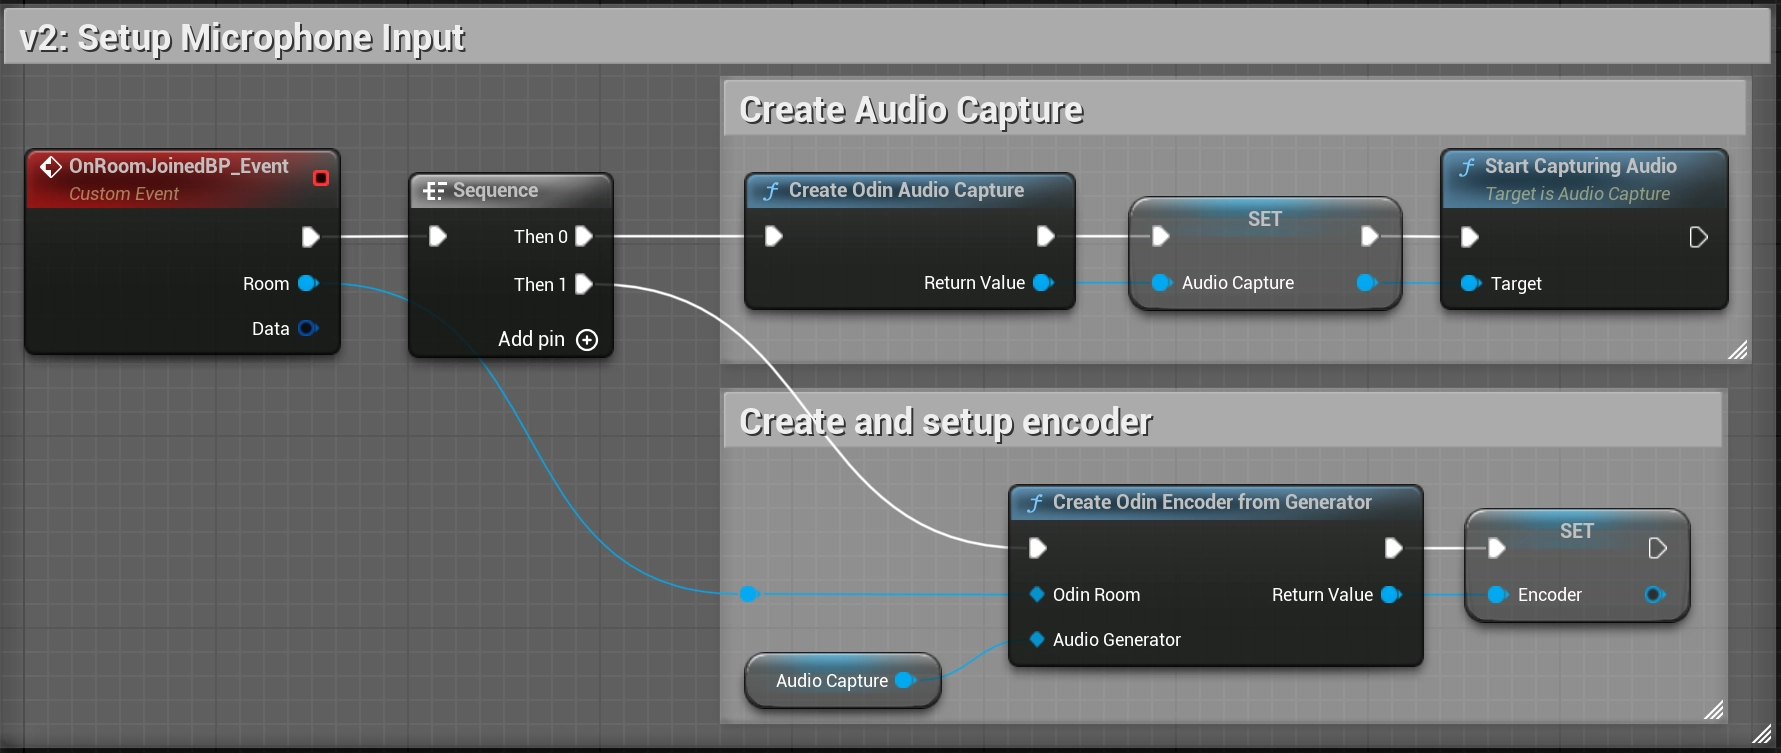
Setting up Microphone Input
Now that we have setup audio playback, the next step is to handle audio input. We need to add our microphone (at least if users should be able to talk) to the room so everyone else in the room hears what we are saying.
To do that, we need to:
- Bind to the On Room Joined event.
- Create an
Odin Audio Captureto access the microphone. - Create an
Odin Encoderfrom that capture and attach it to the room. - Start capturing audio.
We'll set up Microphone Input when the On Room Joined event is broadcast. Create a new Bind Event to On Room Joined BP node using the Odin Room reference we created earlier. Like before, drag out from the Events slot until you see a red line, use the Create Event and choose [Create a matching event] to create a custom event.
Now that we have our Room Joined event handler, we can set up our microphone input. Use a Create Odin Audio Capture node to retrieve an Odin Audio Capture object. This object handles the microphone input. Next, use a Create Odin Encoder from Generator node. Connect the Audio Capture object reference to the Audio Generator input, and your Room variable to the Odin Room input. This function creates the encoder and links it to the room, so the odin encoder will automatically use the microphone as an audio source, encode the audio and push it to the ODIN Voice network.
Finally, call Start Capturing Audio on the Audio Capture object.
It is recommended to promote the Audio Capture and Encoder objects to variables, so you can access them later (e.g. to mute the microphone, stop capturing and access the encoder's audio pipeline).
If you don't find the Create Odin Audio Capture and Start Capturing Audio node, please make sure you have the Audio Capture Plugin enabled which is part of the default Unreal installation. See FAQ for a more detailed description on how to resolve that issue.
Joining an Odin Room
Now, we have everything in place to join a room: We have created a room token, constructed a room object and setup our event flow. Now let's connect everything to join a room.
Add a Connect Room node to your Blueprint Canvas, using the Odin Room variable we created earlier.
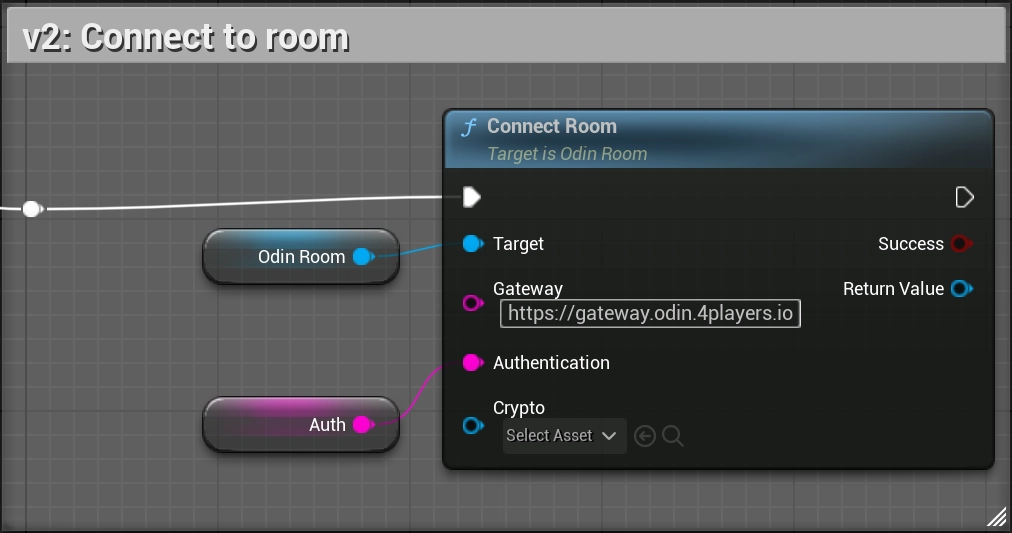
Next, connect the Auth token value, we set up in the "Creating an access token" section, to the Authentication input of the Connect Room node. Finally, we need to configure our gateway. Drag out from Gateway URL of the Connect Room node and choose Promote to Variable. This variable will hold the gateway. Compile the Blueprint and set https://gateway.odin.4players.io as the default value. This is our default public gateway, located in Europe. If you expect your users to be located outside of Europe, take a look at our other available regions in the Managed Cloud Hosting section. You can also launch your own gateway for maximum privacy, but to get started, our public one is a good option.
Leave the Crypto input unconnected for now. It can be used to enable End-to-End Encryption for your voice chat, but we'll cover that in a later guide.
Configuring Audio Processing
If you want to enable Echo Cancellation or Noise Suppression, you can access the Audio Pipeline of the Encoder.
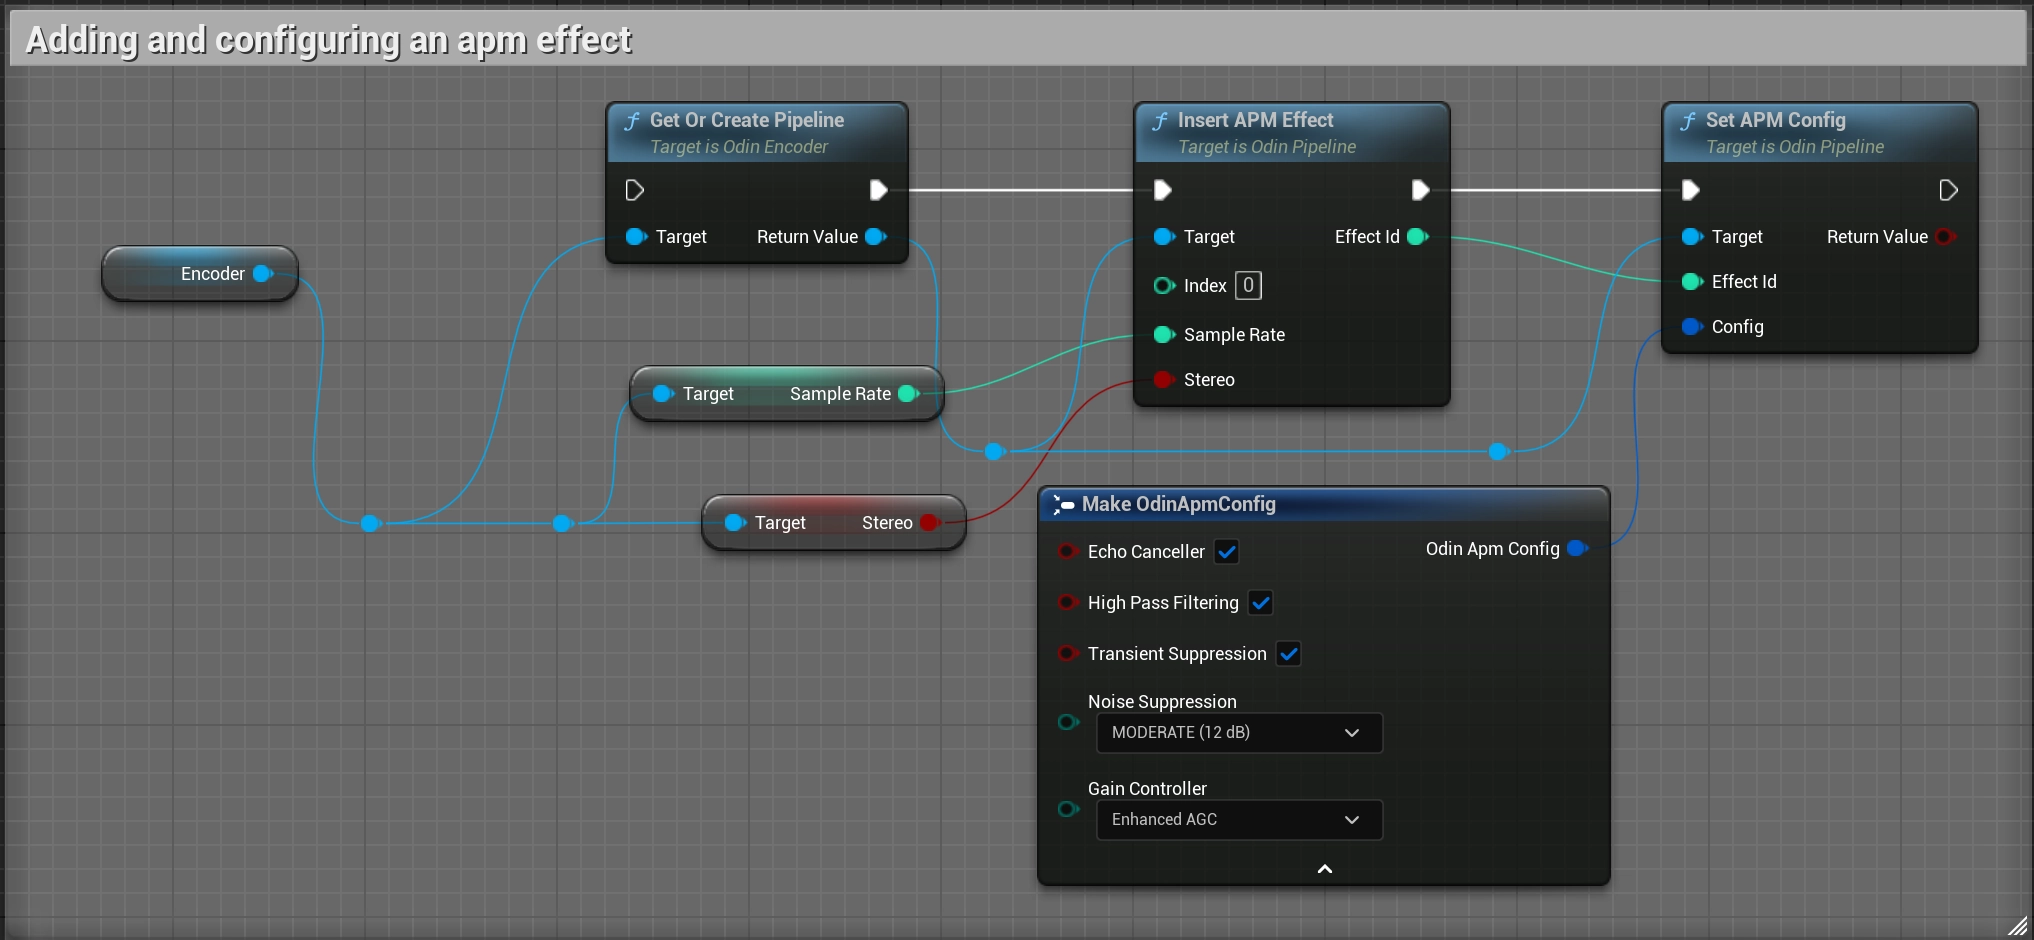
Call Get Or Create Pipeline on the Encoder object. On the returned Pipeline object, you can add effects with Insert APM Effect (for noise suppression and echo cancellation) or Insert VAD Effect (for Voice Activity Detection). When inserting any effect into the audio pipeline, we provide an Index as input. This is the index at which the effect will be inserted into the audio pipeline. By choosing the index for each effect, we can also choose the ordering of effect application. This could be especially important, when creating our own custom voice effects, that might otherwise be filtered out by VAD or Noise Suppression.
Set APM Effect and Set VAD EFfect are used to configure the effects settings.
Adding and configuring an APM effect
We use the sample rate and stereo values of the encoder as input and supply a 0 as Index, meaning this will be the first effect applied to the audio. Details of the APM config settings can be found in the Blueprint Reference.
Adding and configuring a VAD effect
We simply provide a 1 as Index, meaning this will be the second effect applied to the audio. Details of the VAD config settings can be found in the Blueprint Reference.
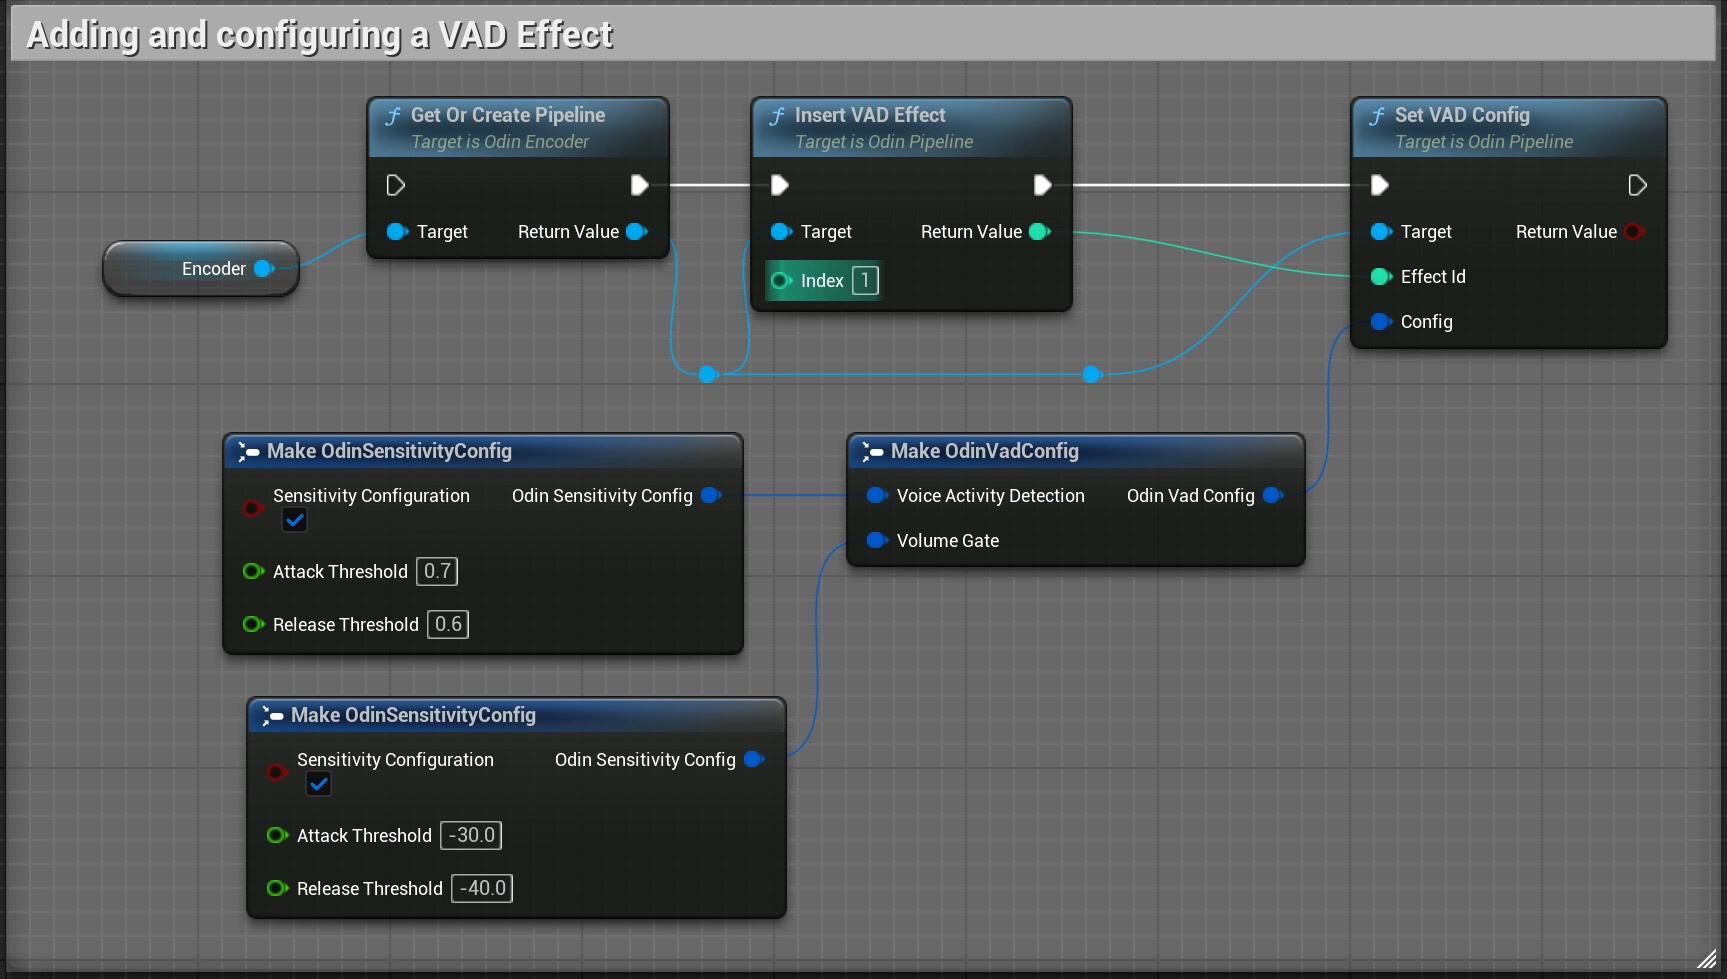
Recommended values are:
Voice Activity Detection:Attack Threshold: 0.7Release Threshold: 0.6
Volume Gate:Attack Threshold: -30.0Release Threshold: -40.0
It's probably best to play around with the values and implement simple sliders for your players to adjust the thresholds themselves. Because your average player doesn't know what good threshold values are, we recommend the following:
- Implement only one slider each for VAD and Volume Gate.
- The VAD Slider should interpolate from values
0.2to0.9, which are directly applied to theAttack Treshold. TheRelease Thresholdis then derived from this value, by subtracting0.1from it. SoAttack Threshold = 0.8automatically setsRelease Threshold = 0.7. - The Volume Gate Slider should interpolate from values
-60.0to-10.0, which are directly applied to theAttack Threshold. TheRelease Thresholdis then derived from this value, by subtracting10.0from it. - Player's don't need to see the exact values they're applying. It should be enough to provide Slidres that apply sensible values.
Testing
To test your ODIN integration, you can either use Unreal's built-in multiplayer testing features or share a standalone build.
Using Play In Editor (PIE)
The simplest way to test locally is to use Unreal's multiplayer options. In the Play menu, set the Number of Players to 2 or more. When you click Play, Unreal will launch multiple instances. Each instance will join the same ODIN room, allowing you to verify that audio is being captured and played back correctly.
Testing with a Standalone Build
Alternatively, you can package your project and run multiple instances on your machine or send the build to a colleague.
ODIN voice chat operates independently of Unreal's native networking. As long as both clients use the same Access Key to generate room tokens and the same Room ID to join, they will be connected in the same voice environment, regardless of whether an in-game multiplayer session is active.
Enabling 3D Audio
So far we have enabled the voice chat in your application, but most likely you want to use the 3D Audio Engine of Unreal. This for itself might be a trivial step since you can simply assign proper Attenuation Settings to your Odin Synth Component. But you also need to consider another problem: the positioning of the Odin Synth Components in your scene.
The simplest solution is to attach the Odin Synth Components to the Pawns representing the respective players, but you somehow need to keep track which Odin Peer is associated with which player.
The implementation in detail depends on your networking and replication system of course, but our Minimal Multiplayer Sample project will provide you with the basic tools for successfully setting up 3D Audio in your multiplayer game.
Conclusion
This is all you need to do for now to add the Odin Synth Components to the correct player characters. Now you can change
the attenuation settings to whatever you need for your voice chat to work in your 3D world - from what we have now it is
the most straight forward to simply drag off of the Create Odin Synth Component (or Add Component) node and call the
Set Attenuation Settings node and assign it a new Attenuation Settings asset that you can create in the Content
Browser like any other asset before.
Odin is agnostic of the audio engine, so you can really just use any engine you like, be it the native Unreal Audio Engine, or a 3rd Party Engine, like Steam Audio, Microsoft Audio, FMOD, Wwise and so on. It is all possible simply by changing the project settings and the attenuation settings of the Odin Synth Component accordingly.