Integrating ODIN Voice Chat with the Wwise Audio Solution in Unreal.
Introduction
Welcome to this guide on integrating the ODIN Voice Chat Plugin with the Wwise Audio Solution in Unreal. The code used in this guide is available on the ODIN-Wwise Sample Project GitHub Repository.
What You'll Learn:
- How the
UAkOdinInputComponentclass works and how to use it in your project - Properly set up ODIN in Unreal when using Wwise as an audio solution
- Deal with limitations and potential pitfalls
Getting Started
To follow this guide, you'll need to have some prerequisites:
- Basic knowledge of Unreal as well as Wwise
- The Wwise Plugin for Unreal, which you can get here
- The ODIN Voice Chat Plugin version 2.x, available here
To set up Wwise in your project, please follow Wwise's in-depth integration-tutorial. You can find the tutorial here.
To set up the ODIN Voice Chat Plugin, please take a look at our Getting-Started guide, which you can find here:
Begin ODIN Getting Started GuideIn this guide we'll show you how to connect an Odin Decoder to stream data from Odin to the Audio Input Plugin of Wwise, which will then pass it to the Wwise Audio Engine. We will only cover the receiving side of the Voice Chat, which uses Wwise to play back audio. The sender uses Unreal's Audio Capture module, which is explained in-depth in the Setting up Microphone Input chapter of the Odin Voice + Unreal v2.x Manual.
Sample Project
You can find a sample project in the Odin + Wwise Github repository. Feel free to download it and set it up in order to view a working integration of this class in a small sample project. The sample project is based on the result of the second video of the Odin tutorial video series.
Pre-requisities
The project uses the following Versions:
- Unreal Engine Version 5.5.4
- Wwise Version v2025.1.6
Installation
The sample project repository does NOT contain the required Wwise Plugins due to their large file sizes. To start this project, you will need to manually install the Wwise plugins using the Wwise Launcher. Please take a look at the Audiokinetic Wwise + Unreal Integration Guide for installation guidelines.
The ODIN Voice Plugin is preinstalled in the project and can be found under Plugins/Odin.
UAkOdinInputComponent
The UAkOdinInputComponent class is an essential part of the Wwise integration. It replaces the default
ODIN UOdinSynthComponent component, taking over the voice output
responsibilities by using Wwise. This script is crucial for receiving voice chat data from the ODIN servers.
The header can be found here and the source file is located here.
The UAkOdinInputComponent inherits from Audiokinetic's AkAudioInputComponent and integrates with the
Wwise Audio Engine through the Audio Input Plugin.
To provide audio data to Wwise, it overrides FillSamplesBuffer and GetChannelConfig.
The implementation is based on Audiokinetic's Unreal tutorial for the Audio Input Plugin, available here: Using the Audio Input Plugin in Unreal. Unlike the tutorial, which uses microphone input, we will feed audio from Odin's Encoder into the Wwise Audio Engine.
You can either follow the Usage setup to drop the UAkOdinInputComponent directly into your project, or take a
look at
how it works to adjust the functionality to your requirements.
This is the header:
And this is the source file of the class:
Remember to update your game module's Build.cs file accordingly.
In addition to the obvious Odin dependency, you also need OdinLibrary for access to odin_is_error().
To integrate with the Wwise Audio Input Plugin, add the AkAudio and Wwise modules as well.
Your PublicDependencyModuleNames should therefore include at least the following modules:
Usage
UAkOdinInputComponent uses the Wwise Audio Input Plugin to stream dynamically generated audio
into the Wwise Audio Engine.
To use it correctly, we first need to configure the Audio Input in the Wwise Authoring Tool,
and then integrate the component into our game logic.
Creating a Wwise Event
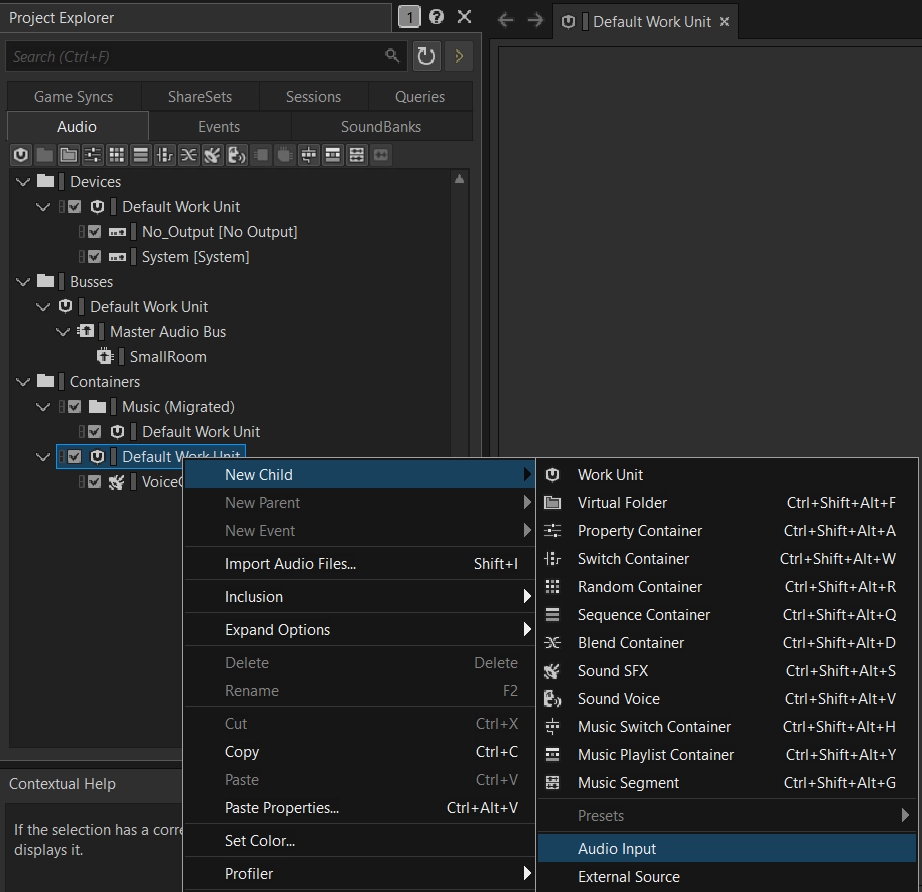
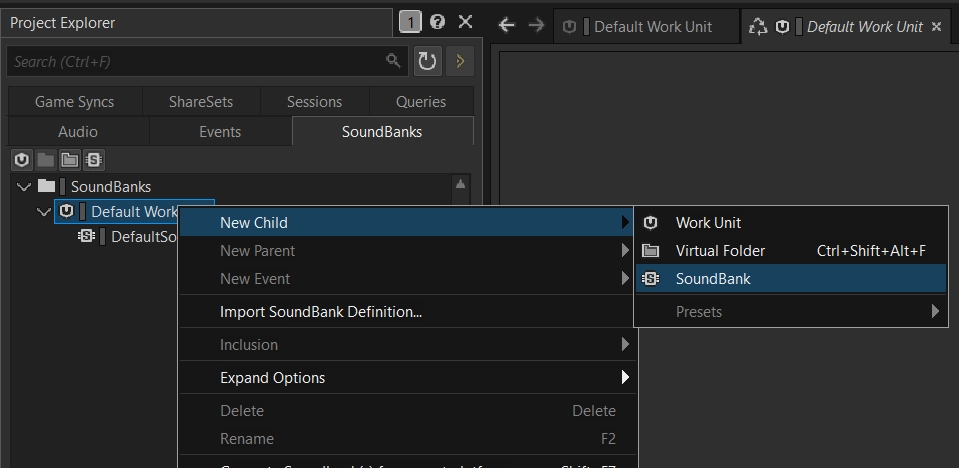
To provide Unreal with the correct Wwise Event you need to add an Audio Input Plugin Source to your Soundbank. An example of this can be found in the sample project. To set this up, follow these steps:
- In the "Audio" tab of the Wwise Project Explorer right-click on the wanted work unit of the "Containers" and add a "New Child->Audio Input".
- Make adjustments to it as needed in your project.
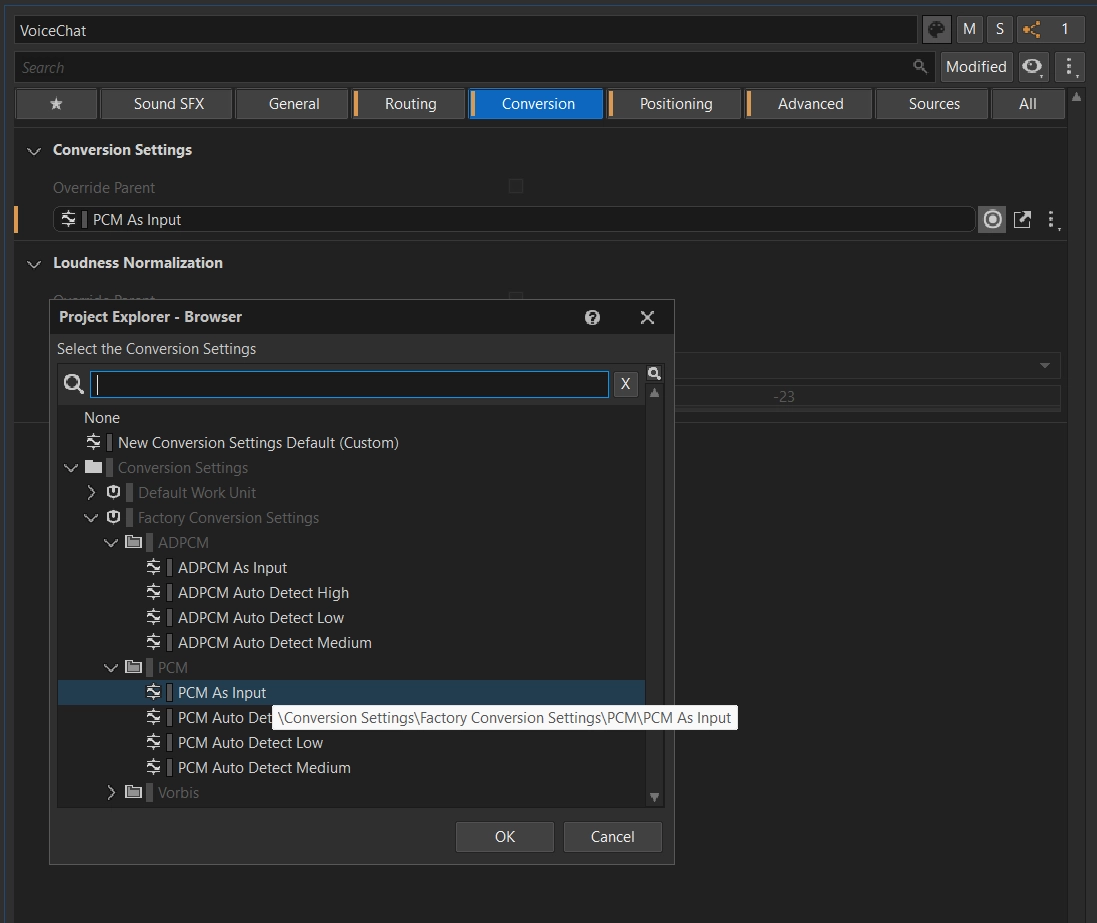
- Make sure to go to the "Conversion" tab in the Contents Editor and set the Conversion to "Factory Conversion Settings->PCM->PCM as Input".
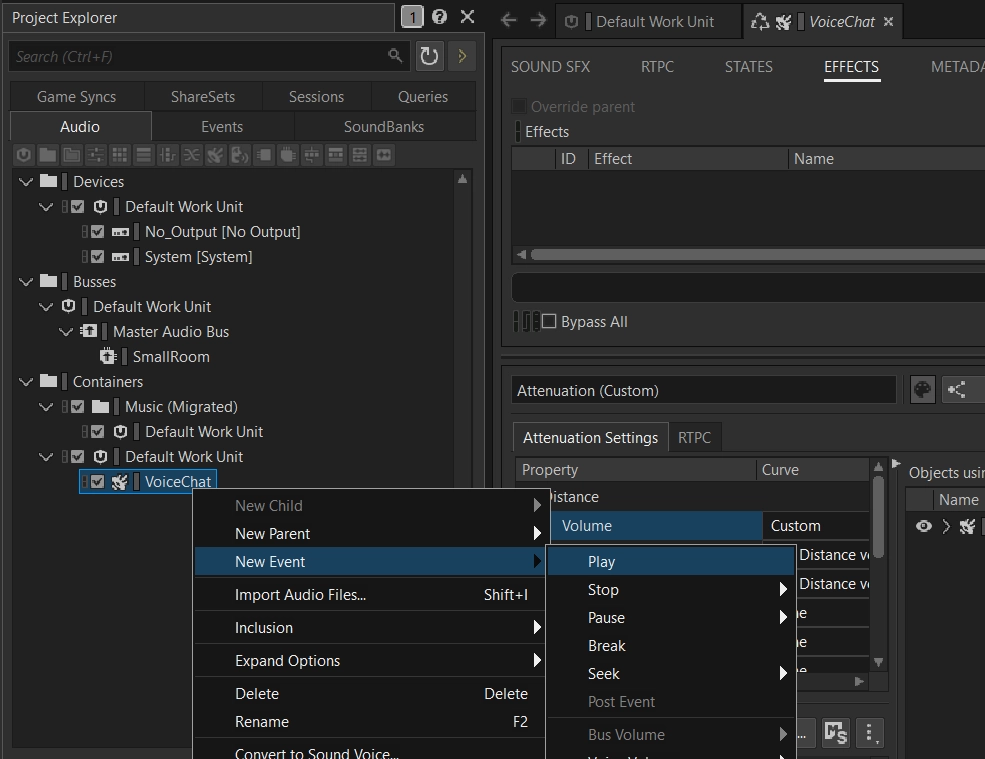
- Right-click the newly created source and add a "New Event->Play" to it.
- If you have no Soundbank yet, create one.
- Lastly, you need to add that event to the Soundbank by dragging it from the "Events" tab in the Project Explorer to the Soundbank's Content Editor.

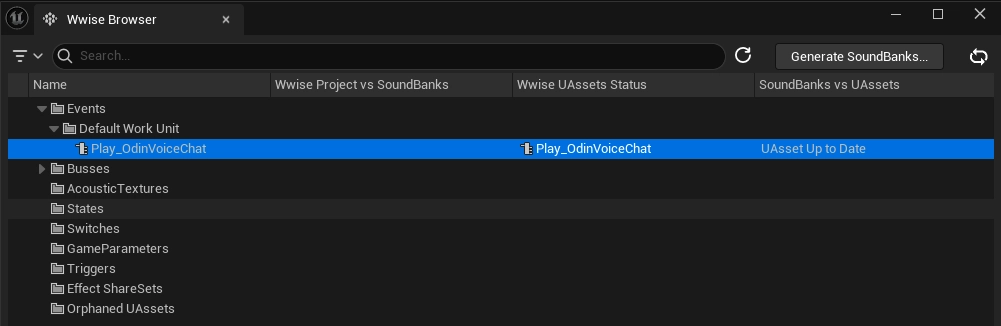
- Export using the Wwise Browser like described in Audiokinetic's Guide in Unreal and you are good to go! A quick way to import to your Unreal Project is to open it in the Unreal Editor and go to
Window->Wwise Browser. Here you can click onGenerate Soundbanksin the top right corner. Now you should be able to see your definedPlay_OdinVoiceChatevent in the Wwise Browser in theEventsfolder in the tree. Drag and drop it into a folder in your content browser and now you can use it in the Unreal project.
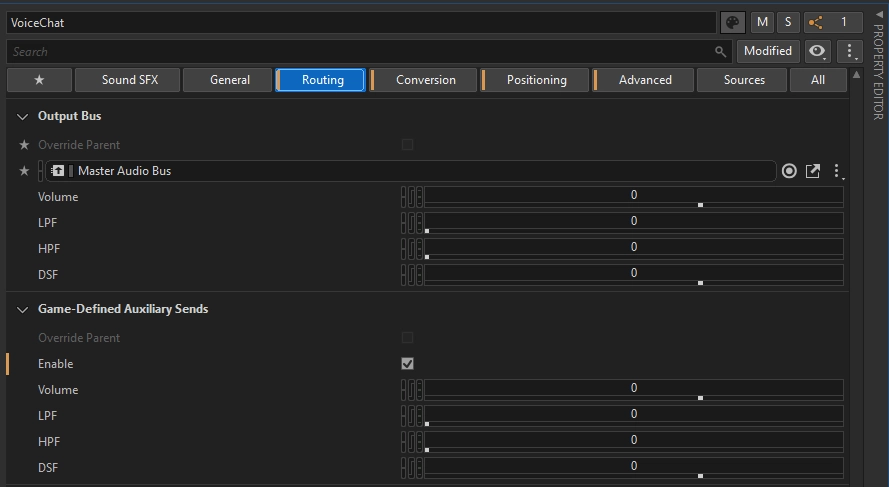
If you'd like Voice Chat Voices to be affected by RoomVerb, make sure to enable Game-Defined Auxiliary Sends on the created Audio Input.
Integrating the Input Component in your Unreal Project
In the next step we will now use the created Wwise event to play back the incoming audio from the Odin Decoder. Again you can find an example of this in the Odin Client Component of the sample project.
The most important change is to replace the creation of any UOdinSynthComponent from your original Odin implementation
(for example the one created in the Odin Unreal Guide) with the new UAkOdinInputComponent.
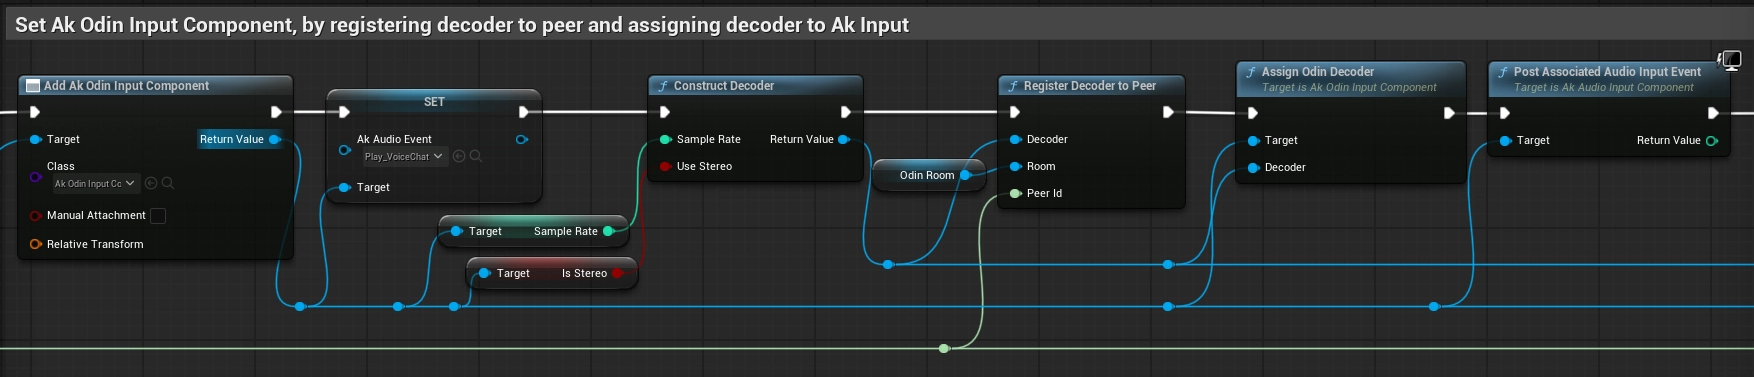
In the On Room Peer Joined event you can set the AkAudioEvent of the created UAkOdinInputComponent
to the Wwise event, that we imported earlier. For constructing the Odin Decoder, we will use the SampleRate and IsStereo value
of the UAkOdinInputComponent as input. After registering the Decoder, we call the Assign Odin Decoder function that we declared in C++ and pass
it the reference to the Decoder. Finally, we need to call PostAssociatedAudioInputEvent on the Input Component. It is important to use this function
on the UAkOdinInputComponent, since any other "Post Event" functions will not work with the Wwise Audio Input Plugin.
As with the UOdinSynthComponent, you can also attach UAkOdinInputComponent directly to your player character as a component
and reference it from your On Room Peer Joined event handler.
This avoids the need to create the component dynamically in Blueprint and makes it easier to configure its properties in the editor, such as Wwise-specific settings like attenuation.
How it works
The above class uses the Wwise Audio Input Plugin to pass dynamically created Audio Data to the Wwise Engine. It copies
the incoming Audio Stream from Odin to the Input Buffer of the Audio Input Component by Wwise. This is done by
inheriting from the UAkAudioInputComponent and overriding the respective methods.
1. Setup
The UAkOdinInputComponent is initialized by passing it a reference to an Odin Decoder.
In this guide, this is done through a Blueprint call, but the same method can also be invoked from any C++ class within your game module.
Internally, the method creates a new FOdinSoundGenerator instance and assigns the incoming Decoder pointer to its PlaybackDecoder.
Once the component has been initialized, the Wwise Audio Input Plugin requests the channel configuration by calling GetChannelConfig.
This call is performed automatically by the Wwise Audio Engine.
2. Reading and Playing Back ODIN Voice Audio
The FillSamplesBuffer function is called by the Wwise Audio Input Plugin whenever additional audio data is required for playback.
In this function, UAkOdinInputComponent invokes FOdinSoundGenerator::OnGenerateAudio to retrieve the next chunk of decoded audio data.
The generated samples are then copied into the output buffer.
If an error occurs during audio generation, the function exits early without writing any data.
Wwise expects audio input as non-interleaved floating-point samples
(see the official documentation for reference),
while FOdinSoundGenerator outputs interleaved audio data.
Because of this, the samples must be rearranged before being written into BufferToFill. This conversion is handled by the
nested for loops at the end of the function.
If the audio data is generated and copied successfully, the function returns true, signaling to Wwise that BufferToFill is ready for playback.
Optimizing with Virtual Voices
In Wwise, a voice can either be physical or virtualized. When virtualized, the voice is not audible and uses minimal system resources. A physical voice, on the other hand, is audible and fully processed. Because this consumes significantly more resources, Wwise imposes a limit on the number of concurrent physical voices. For more information, refer to the Wwise guide on this topic.
If your game involves many players who can potentially speak and listen, you'll need a strategy for managing physical voice usage. Wwise explores several approaches in their documentation, but often more in-game control is required to effectively virtualize unused voices.
Setting up your Wwise project
Since we use an Audio Input Wwise object to stream voice into Wwise, we can't simply trigger play and stop events to manage voice lifecycle.
Instead, we control the Voice Volume of the input object via RTPC using a game parameter.
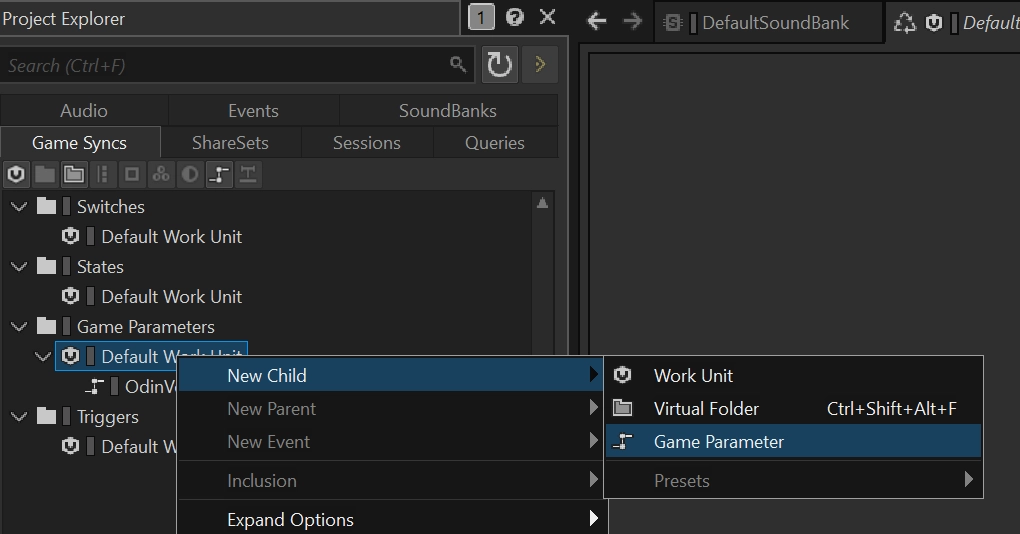
Step 1 - Create the Game Parameter
In the Game Syncs tab, create a new Game Parameter. Set the range to:
Min = 0Max = 1Default = 1
Name the parameter something like OdinVoiceActivity.
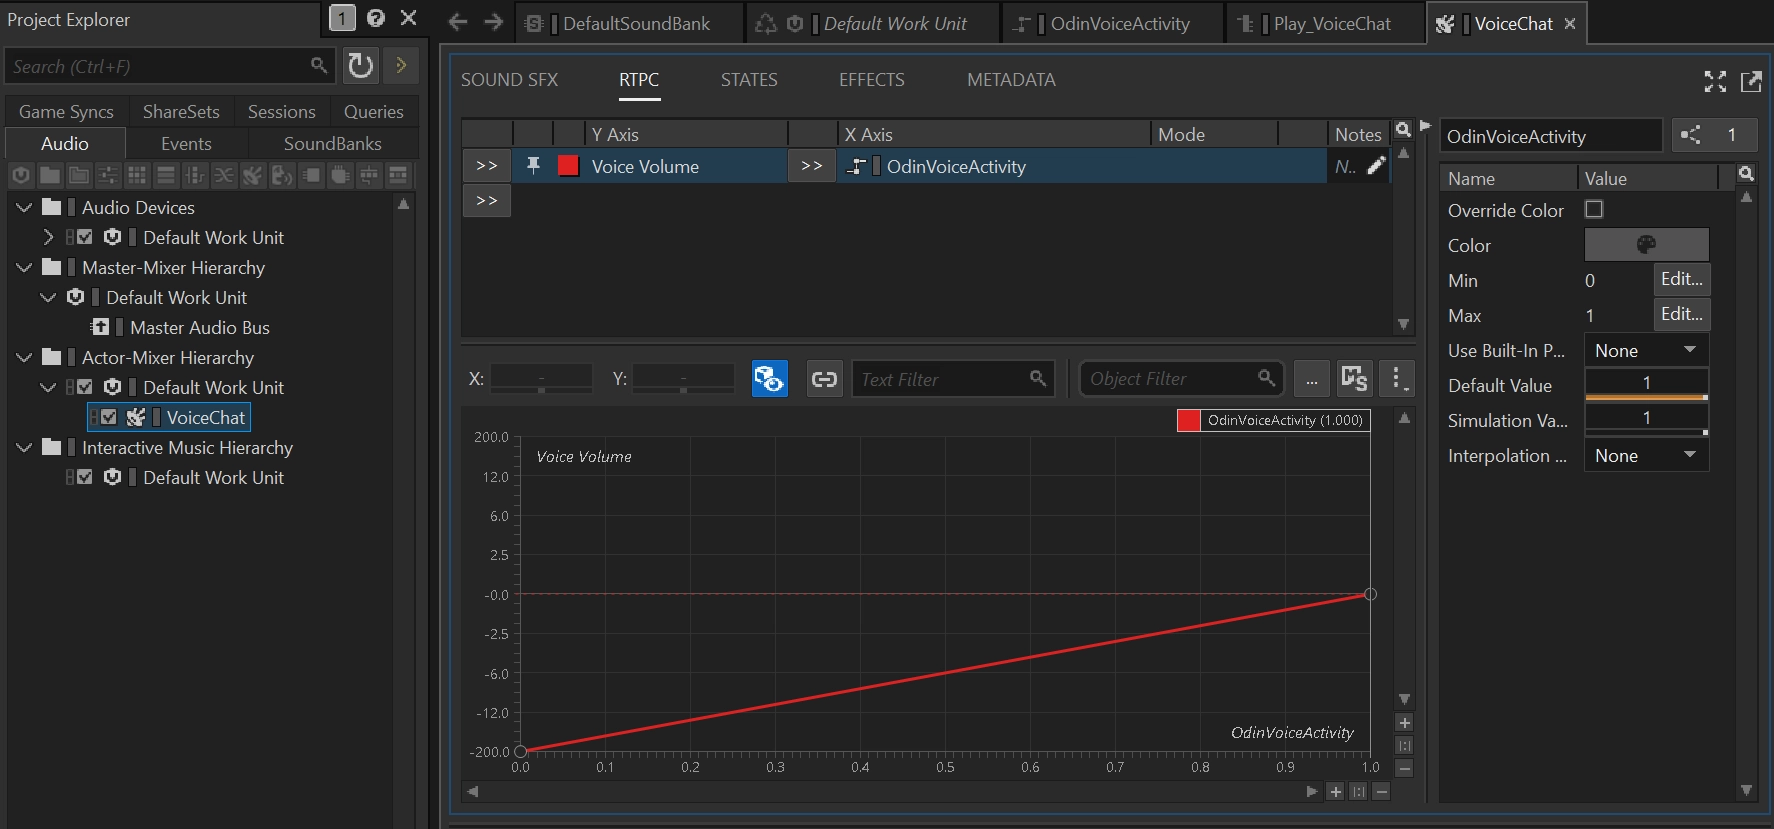
Step 2 - Connect the Game Parameter to Voice Volume
Select the VoiceChat Audio Input object and open the RTPC tab. Add a new RTPC curve:
- Y-Axis: Voice Volume
- X-Axis: your newly created game parameter (e.g. OdinVoiceActivity)
The curve should interpolate automatically:
- 0 maps to -200 (inaudible)
- 1 maps to 0 (normal volume)
This way, setting the parameter to 0 effectively silences the voice input without stopping the event.
Step 3 - Allow Virtualization
In the Advanced Settings of the VoiceChat Audio Input object, set the Virtual Voice Behavior to Send to virtual voice. This allows Wwise to
virtualize the input when the volume is too low to be audible.
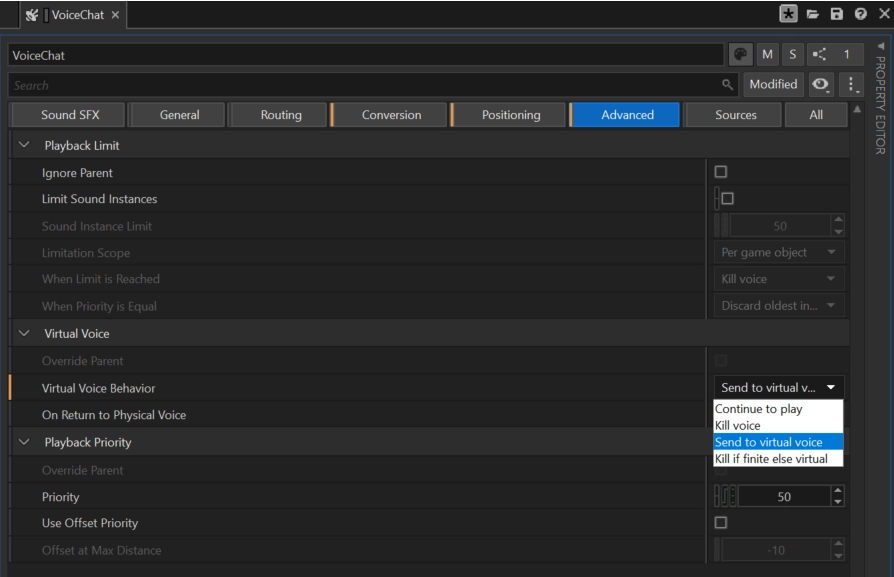
When the RTPC is set to 0, Wwise interprets this as inactive Audio Input and safely virtualizes the voice.
Controlling Virtualization from Unreal
You can now control the RTPC from Unreal in two ways:
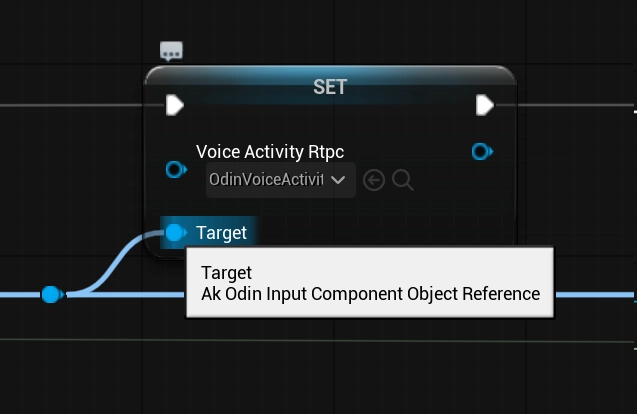
Use VoiceActivityRtpc and SetIsMuted
Assign a value to the VoiceActivityRtpc property on your AkOdinInputComponent. Then call SetIsMuted(true) or SetIsMuted(false) depending on whether the voice should be physical or not.
When SetIsMuted(true) is called, the RTPC is automatically set to 0. When unmuted, it is reset to 1.
Calling SetIsMuted when receiving the On Media Active State Changed event. This is one way to signal to Wwise, that an Audio Input can
be safely virtualized.

Alternatively you can also combine this with a Push-To-Talk setup or any other prioritization metric in your game.
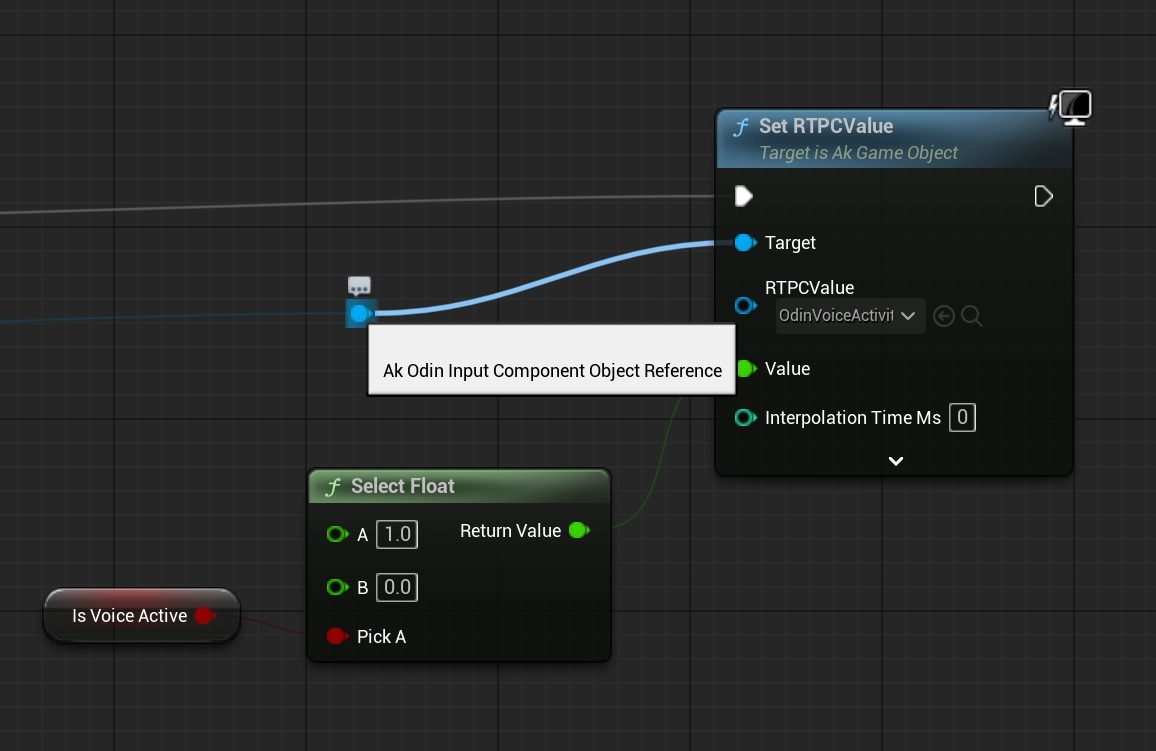
Directly call SetRTPCValue
Alternatively, you can control the parameter manually using SetRTPCValue, referencing the same OdinVoiceActivity game parameter.
Conclusion
This simple implementation of an Odin to Wwise adapter for Unreal is a good starting point to give you the control over the audio playback that you need for your Odin Integration in your project. Feel free to check out the sample project in our public GitHub and re-use or extend any code to fit your specific needs.
This is only a starting point of your Odin Integration with Wwise and the Unreal Engine. Feel free to check out any other learning resources and adapt the material like needed, e.g. create realistic or out of this world dynamic immersive experiences with Wwise Spatial Audio aka " proximity chat" or "positional audio":