Odin Fleet integration with AWS GameLift Anywhere
This guide explains how to run an Unreal Engine dedicated server on Odin Fleet and integrate it into AWS GameLift Anywhere. The setup utilises GameLift features such as matchmaking, session discovery, and lifecycle management while Odin Fleet provides the underlying compute resources.
To demonstrate this integration, the repository includes an example Unreal project for building both a game client and a dedicated Linux server. It also provides a Docker directory containing everything needed to containerize the server for Odin Fleet: a Dockerfile, an entry script for launching the GameLift Agent, the gameliftagent.jar, and a minimal runtime configuration. Together, these components form a complete template for deploying an Unreal server on Odin Fleet and connecting it to GameLift’s backend services.
Download links
Grab the Unreal Engine Dedicated Server and Game Client code from the following repository on the aws-gamelift-anywhere branch:
The Backend Service code for session management is available at the following repository:
Backend Service ProjectRequirements:
- Unreal Engine Dedicated Server Build (Linux): Needed to run the game server inside the container on Odin Fleet.
- Amazon GameLift Server SDK: Enables the server to communicate with GameLift Anywhere for session activation, health checks, and lifecycle events.
- Amazon GameLift Server Agent: Handles compute registration, authentication, and process management for GameLift Anywhere inside the container.
- Docker: Used to build the container image that will be deployed on Odin Fleet.
- Odin Fleet Account: Required to host and run the containerized dedicated server. The integration with GameLift Anywhere enables matchmaking and game session discovery.
Dedicated Game Server
If you don't already have one, create an Unreal Engine dedicated server build. A full instruction can be found here. The example is for 4.27 but the steps are the same in 5.6.
GameLift Server SDK
To connect the game server with GameLift, the game server needs the GameLift Server SDK. The different versions can be found here. We are using the C++ SDK for Unreal. Download and Build the SDK.
Linux or Mac:
Windows
When this is done, copy the sdk to your plugins inside the Unreal Project. There are two folders you can use.
- GameLiftServerSDK: Just contains the server SDK
- GameLiftPlugin: Includes the server SDK and additional UI components for the Editor.
Just copy the folder that fits your need the most. Then add the Plugin to your PublicDependencyModules in your <projectName>.Build.cs
The next step is to initiate the SDK in the server. To do that, add the following code to your GameMode implementation:
and implement the InitiateGameLift function.
Add the SDK includes and instantiate the ProcessParameters:
Implement InitiateGameLift:
And call it in BeginPlay
You dont need to initalize and set any parameter used for AnywhereFleets. These get handled by the GameLift Server Agent.
If your're interested in doing that manually, there is a guide inside the README.md in the plugin folder.
The minimum the game server has to do is:
- Call
InitSDK() - Implement GameSessionCallbacks (
OnStartGameSession,OnTerminateandOnHealthCheck) - Set the used port.
- Call
ProcessReady()
GameLift Server Agent
The GameLift Server Agent handles all neccessary steps to connect your game server with GameLift:
- Reads the AccessKey of your AWS Account
- Registers a compute device
- Reads and refreshes the auth-token for the compute device
- Starts game servers with preconfigured parameters
- Manages the heartbeat
AWS account and User Permissions
To allow the GameLift Agent to register your compute device and communicate with GameLift Anywhere, you must set up an IAM user with the correct permissions.
- In the AWS Console, open IAM and create a new user.
- Under Security Credentials, create a new Access Key (Security credentials > Create access key) and store it safely.
- This user must have permissions for the tasks the GameLift Agent performs:
- gamelift:RegisterCompute
- gamelift:GetComputeAuthToken
- gamelift:DeregisterCompute
The easiest way is to create a custom policy that includes these actions. Go to IAM > Policies, create a new policy, and add the required permissions either via the visual editor or by switching to the JSON view to paste the following policy definition:
Click Next > Save Changes and go back to the user. Add the created policy and the user is ready to be used by the agent.
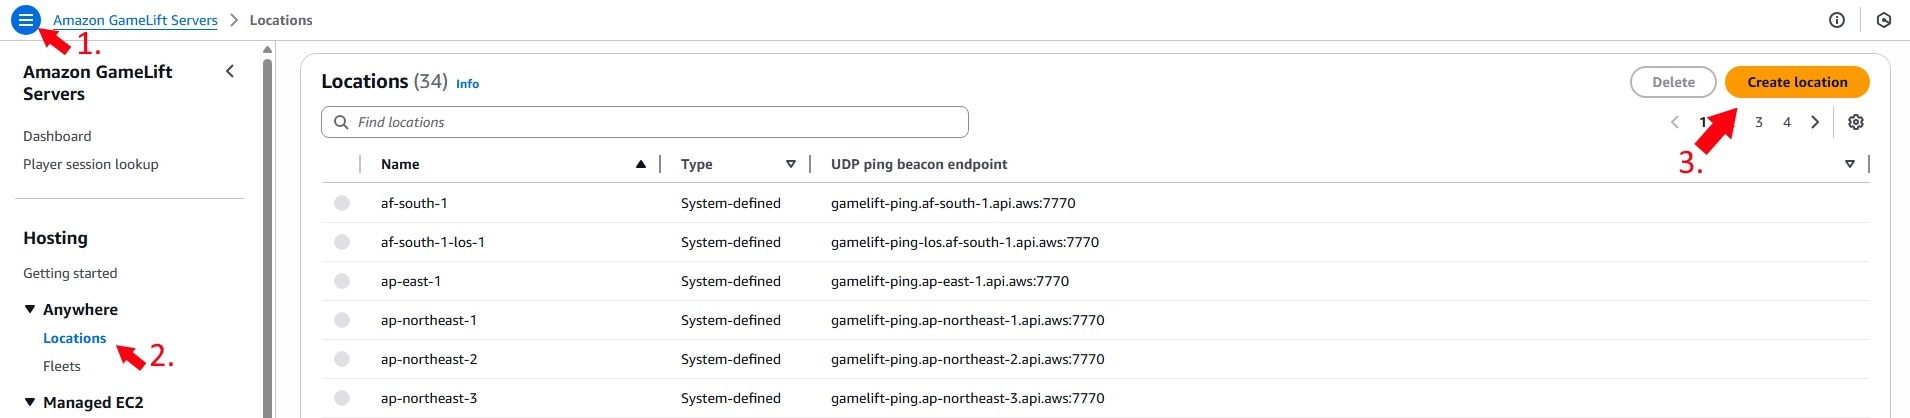
GameLift Location and Fleet
Navigate to Amazon Gamlift Servers and create a custom Location for your AnywhereFleet.
Then create an AnywhereFleet
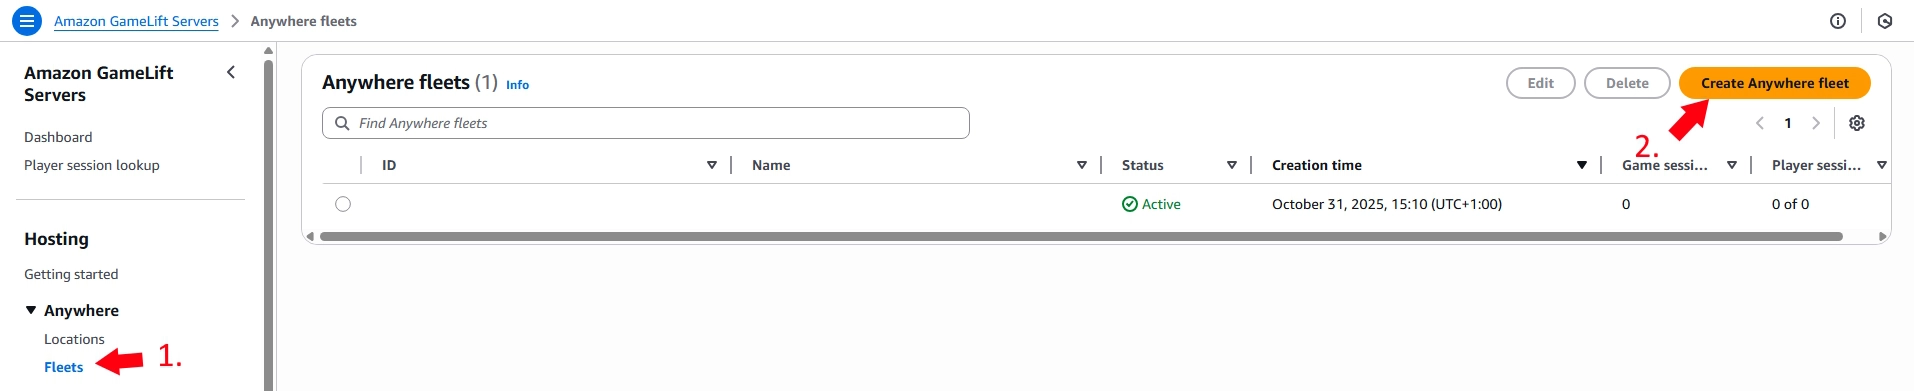
Give it an name and select your custom location.
Initiate the Agent
In this step, you prepare and build the GameLift Agent, then provide it with a runtime configuration so it knows how to start your dedicated server inside the container.
Clone the repository from the Github page.
To build the agent you need at least Java JDK 17 and maven 3.2.5. You can verify that the required versions are installed by calling:
Java:
Maven:
If you're missing the requirements or have outdated versions, you can install the requirements at:
When both match the minimum version, open a new terminal/cmd in the root of the agent(where the pom.xml is located) and build the Agent
If it is successfull, the .jar file is located at ./target/GameLiftAgent-1.0.jar. This .jar file will be the entrypoint of the Docker image which is created later.
The agent needs to know where the server executable is located. This information is provided by a runtime-config.json. This is structured as followed:
IMPORTANT On Windows the LaunchPath is required to start with
C:/Game/,
on Linux with /local/game/. Using a launch path that starts differently will not work with the default gamelift agent code.
For more information, please take a look at the gamelift agent runtime configuration documentation.
Docker
Odin Fleet deploys your dedicated server as a Docker image, so you need a working Docker environment to build and package the server. Install Docker Desktop using the official installer:
https://docs.docker.com/desktop/setup/install/windows-install/
Docker Desktop requires the Windows Subsystem for Linux (WSL). If it is not enabled yet, you can activate it through the command prompt:
Once Docker and WSL are installed, you can build the image that will later run on Odin Fleet.
Unreal Server Build
For the Docker image you are creating you need a Linux build of the game server. To do that you need to install the Linux Cross-Compile chain. Please take a look at the Unreal Guide to setup the cross-compilation chain. You can verify the installation in a terminal by calling:
echo %LINUX_MULTIARCH_ROOT%
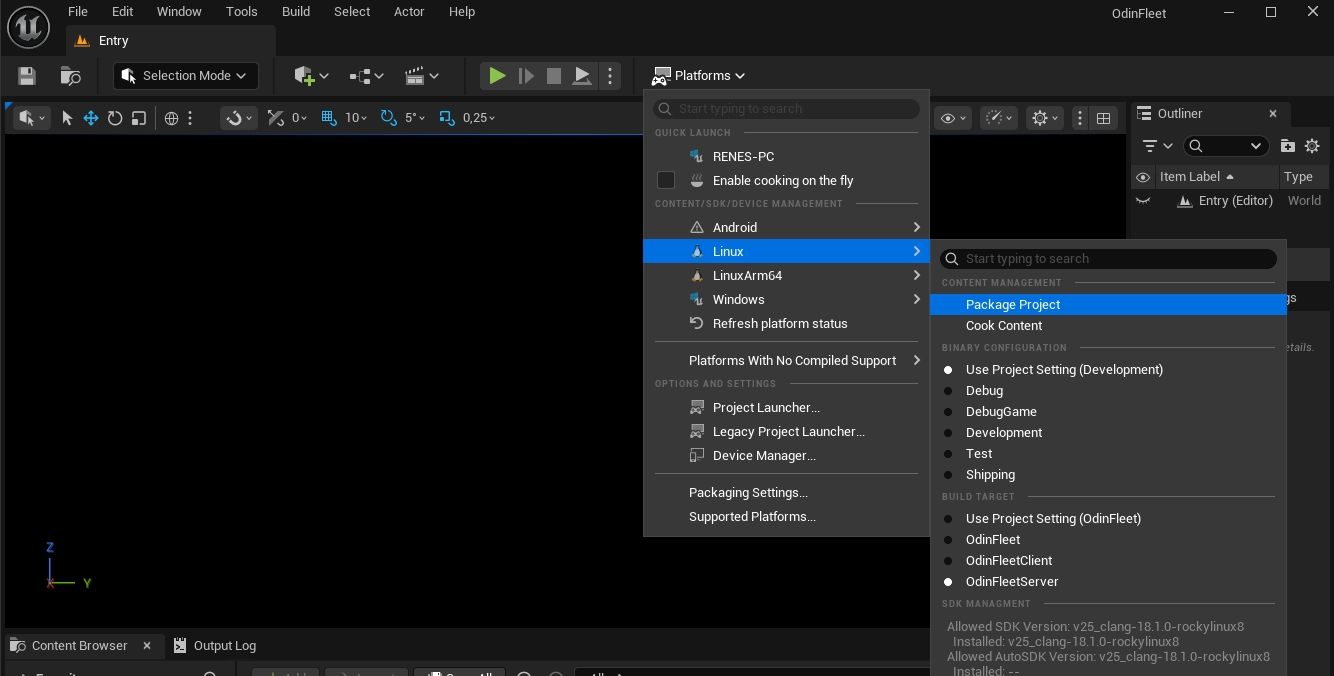
Now build the server-executable. Open the Editor and package the project using the Server Build Target.
You can also package the server using the following command prompt:
Preparing the Docker image
Create a folder (e.g., DockerImageData) that contains all files required to build the server image. Your file structure should look like this:
Inside this folder, create a Dockerfile. This file defines how the image is built, copies all necessary files into the container, and sets the entrypoint, the script or executable that runs when the container starts.
Dockerfile:
We are using a script as entrypoint to start the agent and pass required parameters.
Create a file entrypoint.sh inside your docker file folder.
entrypoint.sh:
This script reads the enviromnent variables and passes them to the agent.
The compute name is generated randomly, because when the agent is closed, the registered compute device remains in the state TERMINATING for about 1-3 days until AWS sets it back to ACTIVE. When you try to register an existing Compute-name that is in the TERMINATING state, the register fails and the agent cannot succesfull connect to an GameLift compute device.
Runtime Config
You can either upload the config to AWS or copy it to the image and set the path in the agent.jar call.
To upload it using the AWS-CLI, call:
and the agent loads it automatically.
If you want to set it manually, add -runtime-configuration or -rc as a parameter to the exec java -jar /gamelift/agent.jar call and pass the config as inline JSON.
The Unreal Linux build contains an GameServer.sh in its root directory. This script calls the server executable which is located in \LinuxServer\<your-project-name>\Binaries\Linux.
We use that .sh scrip as the LaunchPath value in the runtime-config.
Inside the GameServer.sh script we can pass the external port of the Odin Fleet server.
You can use this sample GameServer.sh to automatically read the external Odin Fleet port from the environment variables:
IMPORTANT: Please keep in mind that this file will be overridden if your repackage your project, you will need to update this every time you create a new game server build or adjust your Build Scripts accordingly.
Now we can build the docker image.
Building the Docker Image
Open a command prompt in the directory where the Dockerfile is located and call:
You can now test the image locally on your PC using Docker Desktop. Navigate to image, locate your server image and click run. Now you need to pass the environment variables and set the port.
The following variables are required when using the example setup:
- FLEET-ID
- LOCATION
- REGION
- PUBLIC_IP (IP address of the Odin Fleet server)
- EXTERNAL_PORT
These are used by the Agent internally:
- AWS_ACCESS_KEY_ID
- AWS_SECRET_ACCESS_KEY
If everything works locally you can tag and push this image to Docker Hub.
Odin Fleet
The final step is to load the image on an Odin Fleet server. You can follow the guide steps for creating a Fleet App (Minecraft-server example or Unreal game server example)
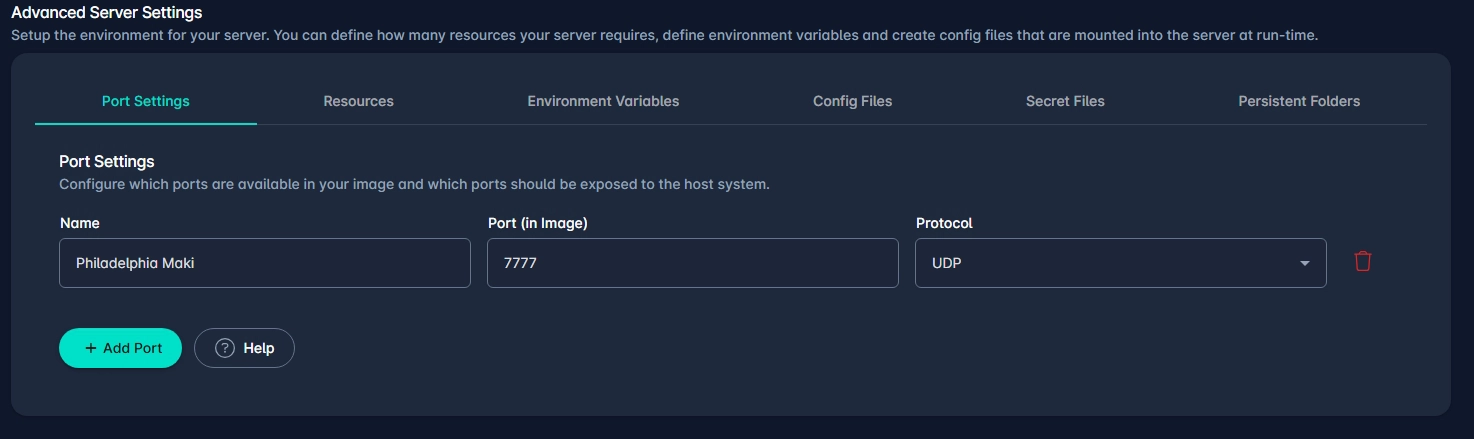
Server Config
Create a port in the Port Settings as mentioned in the referenced guides
Now add a Dynamic Variable to the Environment Variables
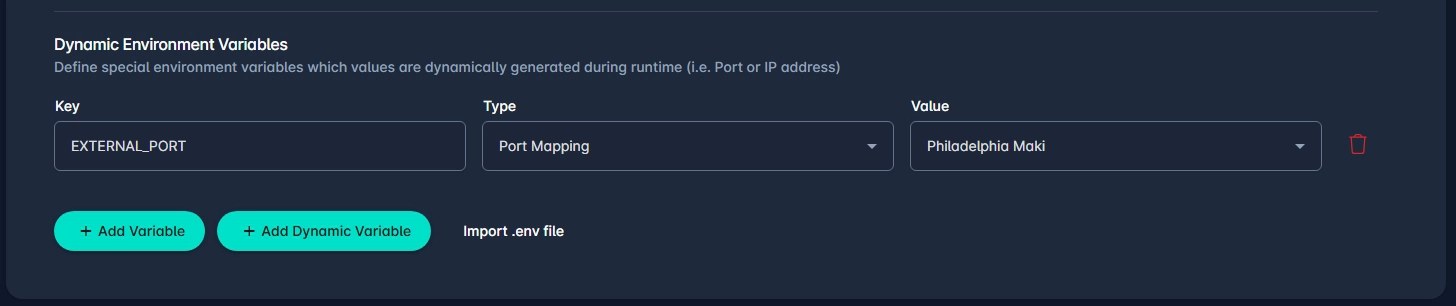
This supplies the EXTERNAL_PORT of the Odin Fleet server to the game server and is transmitted to GameLift.
This also adds a portmapping. The dockerimage gets this port as image port.
Backend Service
To avoid storing an AWS Access Key inside the client, the client itself cannot communicate with AWS to retrieve game session data. This communication should be done with a custom Game Backend Service. Usually this is some kind of a REST-API.
The client communicates with this Game Backend Service, which uses AWS Acces sKeys in a secure environment. To build this API you need the AWS GameLift client sdk.
Install it using:
NPM: npm install @aws-sdk/client-gamelift
Yarn: yarn add @aws-sdk/client-gamelift
pnpm: pnpm add @aws-sdk/client-gamelift
Please keep in mind, that you can use any kind of Node.js/web-service of your choice. In this example we are using GoogleCloud Run functions. We are not going deep into the initialization of an GoogleCloud project, just know these act the same as any other https endpoint. The source code for the Cloud functions can be found in the Backend Service Github repository.
The base setup of the AWS client sdk is as follows:
- Create an input object
- Create the required command
- Pass the input object
- Execute the command
First include the sdk, set some variables and create a GameLiftClient:
Note: You can and should store your AWS Credentials in a credentials-file, environment-variable or another secure storage.
Now you can add the needed commands.
Example implementation for Search for Game Sessions logic:
Example implementation for Create Game Sessions logic:
Example implementation for Terminate Game Sessions logic:
Note: These examples don't use any authorization logic. To secure your service against unwanted or unauthorized calls you need to implement your own security layer!
Unreal Game Client
To allow the client to discover available GameLift sessions, it must communicate with your backend service rather than contacting GameLift directly. The backend exposes simple HTTP endpoints (in our example, via Google Cloud Functions) that return session data or create new sessions.
The following example shows how to query your backend from Unreal Engine using a C++ HTTP request and parse the returned JSON into your own session structures.
Communication Overview
The diagram below illustrates how the different GameLift Anywhere components interact with each other when running a dedicated server on Odin Fleet. It highlights the flow between the GameLift Agent, the GameLift service, and your backend, while excluding the actual gameplay communication between client and server.
